Password Form With CapsLock Warning and Show Password

This post covers a password form I’ve developed developed and am adding to my database-connected utilities.

As I’ve mentioned, I use Excel mostly as a development environment for database queries. So, along with tools like SQL Developer and SQL Server Management Studio, I run and test a lot of my SQL right in Excel. This lets me use all of its filtering, pivoting and other data features to explore and validate query results. I recently even developed a data dictionary in Excel which queries database metadata for helpful information about the tables, fields, foreign keys, etc.

We adhere to an old-school coding style in my workplace. We don’t alias our tables with meaningless one-letter names and we type our SQL in ALL CAPS. I like this, but it means that I often typo case-sensitive passwords because CapsLock is on. So I’m updating my password entry to include a CapsLock check. And while I’m at it I’m adding a “show text” button. And, as often happens when I make something I like, I’m sharing my password form with you.

The Form

In the GIF below, CapsLock was on when the form was called. Once the user clicks in the password textbox the CapsLock warning is displayed. The CapsLock check is called from the textbox’s Enter and KeyUp events, in case it’s pressed while typing the password. The warning is turned off in the Exit event.

You can also see the Show Password feature in action. It’s just a toggle button that switches the textbox’s PasswordChar from “*” to “”.

password form in action

The code includes the GetKeyState API code I found on the web and modified. In the downloadable example below the password form is called from a main module and the username and password are passed back from the form, as in my flexible chooser form post.

Features I Didn’t Add

For a while I made it so that clicking the Show Textbox button put the focus back into the password textbox. This was cool, but harder to code with a predictable circular event between the textbox and the togglebutton. Also, it seemed like overkill for a password form that you won’t be spending much time with. The other thing I looked at was having the Show Textbox control engage only while it was pressed, which seems more secure from shoulder-hackers.

Do you have a password form or suggestions for this one?

Download

Here’s a sample workbook with the form.

RaiseEvent for Multiple UserForm Controls

This Stack Overflow answer solves the problem: How can a form receive events from multiple instances of a WithEvents class? The simple answer is to use RaiseEvent but the problem is that when you create a collection of WithEvents classes, the RaiseEvent only works for the last class instance added to the collection. This post shows you how to connect each WithEvents control to a RaiseEvent using a delegate class and receive the event in the form. For example, you could have changes to any one of a group of textboxes trigger a change in another form control.

(When I came across the Stack Overflow post above I read the explanation but not the code. I let it bounce around my brain for a couple of days and then got the main point that you can just funnel the WithEvents control to the delegate when the WithEvents control fires. After that, writing the code was easy.)

Review: Create a Textbox WithEvents Class

In past posts I’ve discussed UserForm code that creates a collection of WithEvents classes to capture changes to all the textboxes:

Private cEvents As clsEvents
Public collControls As Collection

Private Sub UserForm_Activate()
Dim ctl As MSForms.Control

Set cDelegate = New clsDelegate
Set collControls = New Collection
For Each ctl In Me.Controls
   If TypeOf ctl Is MSForms.TextBox Then
      Set cEvents = New clsEvents
      Set cEvents.cDelegate = cDelegate
      Set cEvents.txtBox = ctl
      collControls.Add cEvents
   End If
Next ctl
End Sub

clsEvents looks like this:

Public WithEvents txtBox As MSForms.TextBox

Private Sub txtBox_Change()
debug.print "Textbox changed"
End Sub

That’s nice for creating a message, or opening a file, or some other action outside the form. But sometimes you want to receive the event in the form and use it as a trigger to change other form controls.

You can add an Event to clsEvents so that it can be raised in the txtBox_Change event and received by another class, such as a form, but again the problem is that only the last textbox added to collControls will raise the event. Previously, I’ve coded around that by passing a reference to the userform into clsEvents, and manipulated the form from the class. It works, but it’s dirty. Plus I think it creates a memory leak.

Modification to allow multiple RaiseEvents

The solution is to create another class, a delegate, that is also instantiated in the userform. The delegate has a single public control property that is set by any of the clsEvents instances, one at a time, as their txtBox_Change event fires. When the txtBox variable is passed to the cDelegate it raises its txtBox_Changed event, which is then received by the cDelegate_Change routine back in the form. This way there’s only one instance of cDelegate, but its txtBox variable refers to whichever clsEvents textbox has changed most recently.

Delegate Diagram

Here’s the code for clsDelegate:

Public Event txtBoxChanged(txtBox As MSForms.TextBox)

Public Sub PassControl(txtBox As MSForms.TextBox)
RaiseEvent txtBoxChanged(txtBox)
End Sub

So simple! And here’s the modified code for clsEvents:

Public WithEvents txtBox As MSForms.TextBox
Private m_cDelegate As clsDelegate

Public Property Set cDelegate(value As clsDelegate)
Set m_cDelegate = value
End Property

Private Sub txtBox_Change()
m_cDelegate.PassControl txtBox
End Sub

m_cDelegate holds the reference to the cDelegate instance that’s passed to clsEvents, so it can pass its txtBox instance to the delegate class. In the form code below you can see where cDelegate is instantiated and where that instance is passed to each cEvent instance:

Private cEvents As clsEvents
Public WithEvents cDelegate As clsDelegate
Public collControls As Collection

Private Sub UserForm_Activate()
Dim ctl As MSForms.Control

Set cDelegate = New clsDelegate
Set collControls = New Collection
For Each ctl In Me.Controls
   If TypeOf ctl Is MSForms.TextBox Then
      Set cEvents = New clsEvents
      Set cEvents.cDelegate = cDelegate
      Set cEvents.txtBox = ctl
      collControls.Add cEvents
   End If
Next ctl
End Sub

Private Sub cDelegate_txtBoxChanged(txtBox As MSForms.TextBox)
Me.Label1.Caption = txtBox.Name & " text length is " & Len(txtBox.Text) & "." & vbCrLf & "Text is: " & vbCrLf & txtBox.Text
End Sub

The last sub in the code is the receiving event. It just updates information about whatever textbox was changed last.

textbox changes

Download!
Here’s a sample workbook with the form and code. Let me know what you think!

Force Userform Textbox Scrolling to Top

I use my Edit Table Query utility every day to easily modify and test SQL in Excel. The main textbox contains the SQL code, which often fills more than the textbox. The problem is when I click into the textbox it always scrolls to the bottom. Even though this has been happening for months this always catches me off guard. I’m surprised, then annoyed. I finally decided to take action, and came up with some code to force userform textbox scrolling to the top.

The Issue
Here’s an example of what I’m talking about. When I click the New Data button the textbox content looks good, in that the numbers start at one. But as soon as I click into it the content scrolls to the bottom. (To add to my annoyance, the scrollwheel doesn’t work in the textbox.)
textbox scrolling issue

My solutions uses the Textbox’s SelStart and SelLength properties. I set both to 0, meaning that the selection starts before the first character. That’s what the “Force Start at Top” checkbox in the form does. (Download below!)

However, when I added those two lines of code another issue appeared. There was no scrollbar. In fact in the animation above you can see that there’s no scrollbar until I click into the textbox. And below you can see that with the scrolling fix applied there is no scrollbar:

no scrollbar after fix

You can force the scrollbar to appear by arrowing down past the bottom of the visible content. An internet search came up with the solution of setting focus on the textbox. I do this before applying the SelStart/SelLength code. That’s what the “Make scrollbars visible” checkbox does:

textbox scrolling fixed

VBA
Here’s a basic subroutine that takes some text and a button object as parameters. It sets a textbox’s text, sets the focus on the textbox, sets the selection start to zero and sets the focus back to the calling button.

Sub FillTextboxText(TextboxText As String, CallingButton As MSForms.CommandButton)

Me.TextBox1.Text = TextboxText
Me.TextBox1.SetFocus
Me.TextBox1.SelStart = 0
Me.TextBox1.SelLength = 0
CallingButton.SetFocus
End Sub

Other Stuff

Note that the issue with the scrollbar not appearing only occurs once in the life in the userform. In other words, once it has appeared it will always appear. I think.

You might have noticed that the form also has a Same Data button, this button simply saves the textbox contents to a string variable and then set the textbox’s text to that variable. Oddly, when you do this and then click into the textbox no scrolling happens at all, even before the checkboxes are checked. To see this, leave the checkboxes unchecked, click Restart, then click New Data, then scroll halfway up and then click Same Data. There’s no scrolling, even though I’ve done almost the same thing as was done with the New Data button.

This all makes me wonder how MS programmed textbox behavior. It seems almost like it forces the textbox to the bottom to make the scrollbar appear, and that it somehow checks the contents before it changes the scrolling position.

Download

Here’s a workbook with the Userform shown in this post.

Chart SelectionChange Event

I’m working on a pivot chart and pivot table navigator. It lets you click around between pivots and their associated charts. It consists of a small form with a list of the active workbook’s pivot tables. You use this list to navigate to pivots and their charts. When you choose a different pivot or chart in Excel itself I want the selected item in the list to change. I can use the SelectionChange event and the Range.PivotTable property to determine which pivot table has been selected. But SelectionChange doesn’t fire when you click into a chart. After messing about for a bit I’ve come up with a chart SelectionChange event that fires on chart selection and also includes all the stuff in a normal SelectionChange event.

The crux of the solution can be found in this excellent Jon Peltier post describing Chart events. It turns out charts are one of the Excel objects that supports WithEvents:

Excel withevents objects

This lets me create a tiny chart class that I can instantiate for each chart in all open workbooks.

Here’s the clsChart class:

'clsChart

Public WithEvents cht As Excel.Chart
Public cFullSelectionChange As clsFullSelectionChange

Private Sub cht_Activate()
Set cFullSelectionChange.Chart_Activated = cht
End Sub

It’s got the WithEvents declaration that allows us to capture chart events. In this case we’re capturing the event that occurs when a charge is activated. When that happens it pokes the Chart_Activated property in the clsFullSelectionChange class. This is the “parent” class that creates an instance of clsChart for each chart in the workbook.

FullSelectionChange Class That Includes Charts

Here’s the code for the cFullSelectionChange class:

'cFullSelectionChange

Private cChart As clsChart
Public WithEvents app As Excel.Application
Private collCharts As Collection
Public Event PivotSelected(pvt As Excel.PivotTable)
Public Event ChartSelected(cht As Excel.Chart)
Public Event OtherSelected()

Private Sub Class_Initialize()
Dim Wb As Excel.Workbook
Dim ws As Excel.Worksheet
Dim chtObject As Excel.ChartObject
Dim cht As Excel.Chart

Set app = Application
Set collCharts = New Collection
For Each Wb In Application.Workbooks
    For Each cht In Wb.Charts
        Set cChart = New clsChart
        Set cChart.cFullSelectionChange = Me
        Set cChart.cht = cht
        collCharts.Add cChart
    Next cht
    For Each ws In Wb.Worksheets
        For Each chtObject In ws.ChartObjects
            Set cChart = New clsChart
            Set cChart.cFullSelectionChange = Me
            Set cChart.cht = chtObject.Chart
            collCharts.Add cChart
        Next chtObject
    Next ws
Next Wb
End Sub

Public Property Set Chart_Activated(cht As Excel.Chart)
RaiseEvent ChartSelected(cht)
End Property

Private Sub app_SheetSelectionChange(ByVal Sh As Object, ByVal Target As Range)
Dim ActivePivot As Excel.PivotTable

On Error Resume Next
Set ActivePivot = ActiveCell.PivotTable
On Error GoTo 0
If Not ActivePivot Is Nothing Then
    RaiseEvent PivotSelected(ActivePivot)
Else
    RaiseEvent OtherSelected
End If
End Sub

The last sub in the class, app_SheetSelectionChange, is a regular old application-level SheetSelectionChange event. It checks whether the ActiveCell is in a pivot table. Note that I could have used Selection just as easily as Activecell. I included this event in this class so that all the selection logic would be in one place, rather than putting it in the UserForm itself as I’d normally do. You’ll see below that this keeps the UserForm code quite simple.

The second-to-last sub is the Chart_Activated Property that gets poked by the individual chart classes when a chart is activated. It receives the activated chart object from the chart class.

Both these last two subs raise events that are hooked in the UserForm. The events are defined at the top of the module. They simply make the pivot table or chart available in the userform, much like an Sh or Target parameter in a built-in event. If you aren’t familiar with raising custom events the info at the end of Chip Pearson’s event page is very helpful.

The class’s Initialize routine creates instances of the chart class – one for every standalone or embedded chart in all open workbooks. If this isn’t familiar, take a look at the same Chip Pearson page linked above, specifically the Declaring WithEvents Variables section.

The UserForm
Because most of the work gets done in the two classes, the UserForm code is simple and powerful. The form looks like this, with textboxes to show either the selected chart or pivot table, if either:

Userform in action

UserForm Code

Private WithEvents cFullSelectionChange As clsFullSelectionChange

Private Sub UserForm_Initialize()
Set cFullSelectionChange = New clsFullSelectionChange
End Sub

Private Sub cFullSelectionChange_ChartSelected(cht As Chart)
Me.txtActiveChart.Text = cht.Name
Me.txtActivePivot.Text = ""
End Sub

Private Sub cFullSelectionChange_PivotSelected(pvt As PivotTable)
Me.txtActivePivot.Text = pvt.Name
Me.txtActiveChart.Text = ""
End Sub

Private Sub cFullSelectionChange_OtherSelected()
Me.txtActivePivot.Text = ""
Me.txtActiveChart.Text = ""
End Sub

The top of the UserForm module has the WithEvents declaration of the cFullSelectionChange class. It’s declared WithEvents because the class raises the pivot and chart activation events that we want to capture in this form. The form’s Initialize sub simply instantiates the
cFullSelectionChange class. Below that are the three event modules for pivot, chart or other selection.

Summary
The form instantiates the cFullSelectionChange class, which in turn instantiates a cChart class for each chart in every open workbook. Whenever a chart is activated its cChart class passes this action up to the cFullSelectionChange class, which raises the selection event in the UserForm.

Download
Here’s a sample workbook with the form and code. Let me know what you think!

Track ActiveCell Movement Within Selection

I searched the internet a bit before deciding that neither Excel or the forums have a way to track Activecell movement in a Selection. So, even though I don’t have the most pressing need for such an event, I spent several quality hours coding one.

The Issue
Here’s what I’m talking about. You can capture cell activation using Selection_Change code:

Private Sub Worksheet_SelectionChange(ByVal Target As Range)
Me.Range("A2") = ActiveCell.Address
Me.Range("B2") = ActiveCell.Value
End Sub

Selection Change

But this doesn’t capture cell activation within a selection, the kind that happens when you select an area and then tab through it:

No ActiveCell Change

I noticed this while creating a little ActiveCell Viewer form. My solution is to capture TAB key presses using Application.OnKey. This is a little clunky in a couple of ways, but it seems to work.

My Solution
So my userform uses OnKey to capture the Tab press when a Selection has more than one cell. Now I know when the active cell is changing within a selection, so that’s good. The hard part is that, since I’ve killed the normal Tab behavior, I have to recreate it in VBA with code that moves the ActiveCell one cell forward. Before I can do that I need to define the active cell’s location in terms of the selection.

Basically, the code cycles through each cell in each Area of the Selection. The Areas cycle through in the order they were selected. Tab cycles through each cell of an Area from top to bottom, right to left no matter how you selected the Area.

A Little More About Areas
I do believe that areas are always rectangular. If you make a selection with the control key down, each down-drag-up of the mouse represents an area. I’ve delved into this area (hah) before in the SelectTracker post. As indicated there, if you hold down Ctrl and click a cell five times you get a Selection with five Areas. Interestingly, Excel 2016 gives the unsuspecting user a bit of a hint that this is happening by making the cell a little darker with each click:

darkening Selection

Back to the Coding Process

At first, as so often happens, the VBA seemed fairly simple:

  1. Find the ActiveCell’s position within the overall Selection by looping through its Areas and through each Area’s cells.
  2. Figure out what the next (or previous) cell would be, accounting for moving from one Area to the next and hopping to the beginning of the next Area or looping back to the beginning of the whole Selection.

Then I started thinking about Selections with multiple Areas that intersect the ActiveCell. To deal with this I did two things needed to make the tabbing flow smoothly through overlapping Areas.:

  1. Created a global variable to track which of these areas was selected by the last Tab press.
  2. Created a short routine to figure out the “most recent” Area that intersects the ActiveCell

The Code
Here’s the code that identifies the Activecell’s position within the Selection’s Areas and Cells:

Private Sub SelectNextCellInSelection()

'This sub is called when the Tab key is pressed.
'The point is to be able to capture Tab key presses
'that occur within a Selection, thereby capturing movement of the Activecell.
Dim SelectionCellIndex As Long
Dim SelectionCell As Excel.Range
Dim SelectionArea As Excel.Range

For Each SelectionArea In Selection.Areas
    SelectionCellIndex = 0
    'Mod lets us cycle to the Area after we reach the last one
    SelectionAreaIndex = (SelectionAreaIndex Mod Selection.Areas.Count) + 1
    For Each SelectionCell In Selection.Areas(SelectionAreaIndex).Cells
        SelectionCellIndex = SelectionCellIndex + 1
        If SelectionCell.Address = ActiveCell.Address Then
            GoTo SelectNext
        End If
    Next SelectionCell
Next SelectionArea

SelectNext:
'Cycle to the next cell. If we're in the last one, we'll cycle to first.
SelectionCellIndex = (SelectionCellIndex Mod Selection.Areas(SelectionAreaIndex).Cells.Count) + 1
'If we're in the first cell must have gone to the next Area.
If SelectionCellIndex = 1 Then
    SelectionAreaIndex = (SelectionAreaIndex Mod Selection.Areas.Count) + 1
End If

Selection.Areas(SelectionAreaIndex).Cells(SelectionCellIndex).Activate
'Because it will get incremented next time round
SelectionAreaIndex = SelectionAreaIndex - 1
End Sub

The code above uses the Mod function to cycle back to the beginning of the next Area or of the entire Selection.

The code to cycle backwards was surpisingly more difficult. Mod didn’t work in reverse, For/Next doesn’t work in reverse, and the beginning number is the last number of the previous Area changes (not 1). So although the logic was the same, the coding was much trickier.

Putting this in a UserForm had the additional complication that the procedures assigned to a key using OnKey have to reside in a regular module. So my code has two very short routines that poke a property in the UserForm, effectively passing the action back into the form as soon as possible.

I also learned VBA’s AppActivate command which shifts the focus from the form to Excel proper. I do that at the end of the forms Activate procedure, since it’s a Viewer after all and doesn’t need the focus.

The ActiveCell Viewer
You may be wondering why you even need an ActiveCell viewer. Well, you probably don’t. But if you did, it might be to see what’s in cells with big blobs of text, or ones that are in hidden columns or rows. And its ability to view cell contents using different format strings might also be nice:

Viewer in Action

Download
Download the sample workbook and try it yourself!

Filter and Sort a Listbox With a Helper Table

I’ve been attempting to bend the Recent Files folder to my will for creating my own recent files form in Excel. My motivation is that Recent Files in Excel 2013 is one step further removed than in 2010. Now I’ve got a form that accesses all the Excel files in Windows Recent folder. I learned some interesting things putting it together, like how to extract a shortcut’s path in VBA. Even more interesting – instead of filtering and sorting the form’s main listbox using Like functions, arrays and collections, I just pull all the file data into a structured table and use it as the listbox’s source. When I want to sort or filter the listbox I just sort or filter the table and re-populate the listbox from the table. Much easier! No multi-dimensional array quicksorts or dictionaries required.

Recent Files form and table

In actual use, the sheet with the table is hidden (it’s in my utility addin), but above is a picture of the form and the table working together.

Background

The Windows Recent Files list is some kind of semi-virtual folder that contains a bunch of shortcuts to the files you’ve opened since, well, I’m not sure when. In my Windows 10 and Windows 7 computers the path

Environ("APPDATA")\Roaming\Microsoft\Windows\Recent

gets me there.

One interesting thing about the Recent folder is that it contains workbooks that you create with code, which isn’t necessarily true in Excel’s Recent list. It also contains addins.

The folder looks like this:

Recent Files folder

It’s chock-full of all kinds of shortcuts. At first I thought I’d just use a FileBrowserDialog with the filter set to .xls* but that doesn’t work because the file types are really all .lnk. You can enter “.xl” in the Search box in the upper right and it will filter to just Excel files, but I can’t find a way to get something into the Search box using VBA.

So next I just plunked all the filenames into a sheet and added hyperlinks to the files that still exist (just like Excel’s recent files list, the shortcuts can outlive the files):

Recent Files sheet

That kind of works, isn’t a great interface for something like this. The thing that really doesn’t work is that without VBA you can’t click multiple hyperlinks at once.

So instead I turned that table into the source for a listbox on a userform. It’s got columns showing whether the file has been deleted, its modified date and full path:

Recent Files form

Filtering and Sorting the Listbox using the Tables Sort and Filter Objects

There it is nicely filtered to files that haven’t been deleted and other stuff sorted from newest to oldest, etc. And in order to get those nicely sorted dates, I just turned on the macro recorder and fiddled with some table-sorting VBA that it generated. Here’s the routine for the click event for the date-sorting label:

Private Sub lblFIleSort_Click()
Dim SourceTable As Excel.ListObject

If Me.lblFIleSort.Caption = "Unsorted" Then
    Me.lblFIleSort.Caption = "A to Z"
ElseIf Me.lblFIleSort.Caption = "A to Z" Then
    Me.lblFIleSort.Caption = "Z to A"
ElseIf Me.lblFIleSort.Caption = "Z to A" Then
    Me.lblFIleSort.Caption = "A to Z"
End If
Me.lblDateSort = "Unsorted"

Set SourceTable = ThisWorkbook.Worksheets("RecentFiles").ListObjects("tblRecentFiles")
With SourceTable.Sort
    .SortFields.Clear
    .SortFields.Add Key:=SourceTable.ListColumns("File").Range, _
                    SortOn:=xlSortOnValues, _
                    Order:=IIf(Me.lblFIleSort.Caption = "A to Z", xlAscending, xlDescending), DataOption:=xlSortTextAsNumbers
    .Header = xlYes
    .Orientation = xlTopToBottom
    .Apply
End With
FillLstRecentFiles
End Sub

That’s some pretty simple sorting code for a three-column listbox! The code for filtering it by filename is even shorter:

Private Sub txtFileFilter_Change()
Dim SourceTable As Excel.ListObject

Set SourceTable = ThisWorkbook.Worksheets("RecentFiles").ListObjects("tblRecentFiles")
SourceTable.Range.AutoFilter Field:=3, Criteria1:="=*" & Me.txtFileFilter.Text & "*", Operator:=xlAnd
FillLstRecentFiles
End Sub

The last line of each sub above calls the FillLstRecentFiles subroutine, which plunks the visible rows in the helper table into the listbox:

Sub FillLstRecentFiles()
Dim SourceTable As Excel.ListObject
Dim VisibleList As Excel.Range
Dim SourceTableArea As Excel.Range
Dim SourceTableRow As Excel.Range
Dim Source() As String
Dim i As Long

Me.lstRecentItems.Clear
Set SourceTable = ThisWorkbook.Worksheets("RecentFiles").ListObjects("tblRecentFiles")
On Error Resume Next
Set VisibleList = SourceTable.DataBodyRange.SpecialCells(xlCellTypeVisible)
On Error GoTo 0
If VisibleList Is Nothing Then
    GoTo Exit_Point
End If
For Each SourceTableArea In VisibleList.Areas
    For Each SourceTableRow In SourceTableArea.Rows
        i = i + 1
        ReDim Preserve Source(1 To 3, 1 To i)
        Source(1, i) = SourceTableRow.Cells(1)
        Source(2, i) = SourceTableRow.Cells(2)
        Source(3, i) = SourceTableRow.Cells(3)
    Next SourceTableRow
Next SourceTableArea
'If there's just one row
If i = 1 Then
    Me.lstRecentItems.Clear
    Me.lstRecentItems.AddItem (Source(1, 1))
    Me.lstRecentItems.List(0, 1) = Source(2, 1)
    Me.lstRecentItems.List(0, 2) = Source(3, 1)
Else
    Me.lstRecentItems.List = WorksheetFunction.Transpose(Source)
End If

The main thing about the code above is that it cycles through the discontiguous Areas of the filtered table.

I’ve taken this code and added it to my main utility addin. Every time I open the utility it creates the sheet with the source table. When the form is closed the table gets deleted. It’s not terribly fast on a network when it first parses through all the files, so I don’t know how much I’ll actually use it. But I’m pretty sure I’ll be using listbox helper tables.

Have You Ever Used a Table Like This?

I’m curious whether you’ve ever used a table as a listbox helper like this. If so, how well did it work?

Download

Here’s a download so you can try it out . It also has some nifty code for getting a shortcut’s path and other treats as well.

download

Dynamically Resize Form Controls With Anchors

Every once in a while I work on a VB.Net project. The coolest was building an interface connecting an ArcGIS front-end to a SQL Server backend… but that’s another story. One thing I always enjoy about Visual Studio, besides the post-1900s IDE, is the forms. They have many fine features, like rich textboxes you’re allowed to use, data-connected listviews and, perhaps my favorite, dynamically resizable controls. The resizing behavior is set using left, right, top and bottom “anchors.” You set the anchors right in the Properties dialog box:

dotNet anchor property

So of course, I decided to create anchors for my VBA forms. And I think I’ve succeeded:

My Form With Anchored Controls

yoursumbuddy form

The form above has two frames, a listbox, three textboxes and two commandbuttons. Their moorings are shown in this table:

anchor settings

How Do Anchors Work?

If you use only one anchor in a pair, like only the Left anchor, then the control moves when the form is resized, maintaining the same distance between the control and the left edge of its parent container. Its size doesn’t change. If you choose both Left and Right anchors then the control grows or shrinks horizontally to fit the parent container. It’s kind of like having left-justified, right-justified or distributed text in a cell:

left right anchor demo

In this imperfect analogy, the words are the controls and the cells are the parent containers. The same concept applies to Top and Bottom anchors.

Coding the Anchors

I used to do this kind of thing piecemeal by relating the position of one control relative to its form or another control:

old style code

It works, but it’s cumbersome and requires the use of things like a WIDTH_PADDING constant, an indication that I don’t quite know what I’m doing.

It took a while to figure out the logic for handling all the form’s controls no matter where the are on the form, what types of anchors they have and whether they’re inside another control or not. At first my formulas still looked a lot like the code above, attempting to accommodate the borders around parent controls and such.

The secret I found is to just relate the anchors to the original height and width of their parent control, whether that parent is the form itself or a frame within the form. Then you can just apply the change in width or height of the parent to the position and size of the child control:

The code to do this is in a class which you instantiate and populate from the form:

Public Sub ResizeControls()
Dim i As Long

For i = LBound(m_ControlsAnchorsAndVals) To UBound(m_ControlsAnchorsAndVals)
    With m_ControlsAnchorsAndVals(i)
        If .AnchorTop And .AnchorBottom Then
            .ctl.Top = .StartingTop
            .ctl.Height = Application.WorksheetFunction.Max(0, .StartingHeight + _
                (.ctl.Parent.InsideHeight - .ParentStartingHeight))
        ElseIf .AnchorTop And Not .AnchorBottom Then
            .ctl.Top = .StartingTop
        ElseIf Not .AnchorTop And .AnchorBottom Then
            .ctl.Top = .StartingTop + (.ctl.Parent.InsideHeight - .ParentStartingHeight)
        End If
        If .AnchorLeft And .AnchorRight Then
            .ctl.Left = .StartingLeft
            .ctl.Width = Application.WorksheetFunction.Max(0, .StartingWidth + _
                (.ctl.Parent.InsideWidth - .ParentStartingWidth))
        ElseIf .AnchorLeft And Not .AnchorRight Then
            .ctl.Left = .StartingLeft
        ElseIf Not .AnchorLeft And .AnchorRight Then
            .ctl.Left = .StartingLeft + (.ctl.Parent.InsideWidth - .ParentStartingWidth)
        End If
    End With
Next i
End Sub

m_ControlsAnchorsAndVals is an array of types, one element for each control. The type specifies which anchors apply to that control, the control’s original dimensions and its parent’s original dimensions:

Private Type ControlAnchorsAndValues
    ctl As MSForms.Control
    AnchorTop As Boolean
    AnchorLeft As Boolean
    AnchorBottom As Boolean
    AnchorRight As Boolean
    StartingTop As Double
    StartingLeft As Double
    StartingHeight As Double
    StartingWidth As Double
    ParentStartingHeight As Double
    ParentStartingWidth As Double
End Type

Here’s the Userform code that fills the array of Types, instantiates the class and assigns the eight controls and their anchors:

Private Sub UserForm_Activate()
'We know how many controls we're dealing with
Dim ControlsAndAnchors(1 To 8) As ControlAndAnchors

'Chip Pearson code
MakeFormResizable Me, True
ShowMinimizeButton Me, False
ShowMaximizeButton Me, False

With ControlsAndAnchors(1)
    Set .ctl = Me.Frame1
    .AnchorTop = True
    .AnchorLeft = True
    .AnchorBottom = True
    .AnchorRight = True
End With
With ControlsAndAnchors(2)
    Set .ctl = Me.Frame2
    .AnchorTop = True
    .AnchorBottom = True
    .AnchorRight = True
End With

'... etc

With ControlsAndAnchors(8)
    Set .ctl = Me.CommandButton2
    .AnchorBottom = True
    .AnchorRight = True
End With

Set cFormResizing = New clsFormResizing
cFormResizing.Initialize Me, ControlsAndAnchors
End Sub

Add a little Chip Pearson form resizing code and you’re good to go.

Some Important or Perhaps Interesting Stuff to Know if You Try This

  1. It’s important to add the controls to the array in order of their hierarchy. If you resize a control before its parent is resized it won’t work.
  2. The WithEvents userform object seems to lack a Resize event. It does have a Layout event, which occurs whenever the form or any control on it is moved or resized. I could have worked with that, but instead I call the class’s ResizeControls subroutine from the form’s Resize event.
  3. This project makes use of Chip Pearson’s excellent API form code, which allows you to resize, and add maximize and minimize buttons to, a form.
  4. After finishing this I did a search and found that Andy Pope (of course!) did something like it ten years ago. He uses an enum, which is always fun, and has some different features, like setting a minimum control size. Unless I’m mistaken though, his code relates the change in control size or position only to the overall form, not to the control’s parent container. This can lead to oddness if you have two side-by-side frames containing controls.

Download

This download contains the code and form. It also has a copy of the table shown above that has the anchors listed for each control. I tied the table to the code so you can change the values of the anchors, run the form, and see how it behaves.

Be careful, or you might get something like this:

mixed up form

Flexible Chooser Form With Apply Button

“Apply” buttons in forms can be confusing. People sometimes think they have to hit Apply before they hit OK But OK really means “make the change and close,” while Apply means “make the change but don’t close.” Also, a Cancel button on a form with an Apply button doesn’t actually cancel actions that were applied, just those since the last apply. At least that’s the way it works in many Windows dialogs, like Windows Explorer’s:

win explorer apply cancel

Excel’s Conditional Formatting dialog adds an extra wrinkle. Below I’ve modified a rule to change the color for orange for macaroons. I haven’t hit Apply yet, so I could choose:

1. Apply to save the change and keep on working
2. OK to save the changes and exit
3. Cancel to exit without saving

CF Apply button 1

Once I hit Apply, the Cancel button changes to a Close button. At this point OK and Close mean the same thing: close the form. It seems like Close is just a placeholder for the Cancel button, which will reappear once I start to change something. It is nice that Close and Cancel actually mean what I’d expect with this dialog.

CF Apply button 2

A less confusing form might be one with just an Apply and a Close button. It’s really all you need, and the only downside haveing to click Apply and then Close instead of OK. I did this on one of my own utility forms, but in general I’ll keep using OK buttons because that’s the norm.

Adding an Apply Button to My Flexible Chooser Form

Back in A Flexible VBA Chooser Form I showed how to create a simple form to which you pass some values and which returns a choice. The example let the user pick from a list of pivot fields and then highlighted the field’s range and showsed some information about it. For this post, I modified that code to add an “Apply” button, so you can stay in the form and show info for different fields as long as you want.

Much of the form’s code is unchanged from the earlier post, so read it if you want more background. Its “ClosedWithOk” property is now a more flexible FormState one that stores whether the Apply, OK or Close button was clicked. The code that calls the form is also mostly similar, with a Do While loop added to manage the Apply button. Here it is:

Sub ShowPivotFieldInfo()

Dim pvt As Excel.PivotTable
Dim lo As Excel.ListObject
Dim StartingCell As Excel.Range
Dim i As Long
Dim FormState As String
Dim DoneWithForm As Boolean
Dim PivotFieldNames() As String
Dim pvtField As Excel.PivotField
Dim ChosenName As String

Set pvt = ActiveSheet.PivotTables("pvtRecordTemps")
Set lo = ActiveSheet.ListObjects("tblRecordTemps")
Set StartingCell = ActiveCell
With pvt
    ReDim PivotFieldNames(1 To .VisibleFields.Count) As String
    For i = 1 To .VisibleFields.Count
        PivotFieldNames(i) = .VisibleFields(i).Name
    Next i
    DoneWithForm = False
    Do While Not DoneWithForm
        ChosenName = GetChoiceFromChooserForm(PivotFieldNames, "Choose a Pivot Field", FormState)
        DoneWithForm = (FormState <> "Apply")
        If ChosenName = vbNullString Then
            GoTo Exit_Point
        End If
        Set pvtField = .PivotFields(ChosenName)
        With pvtField
            Union(.DataRange, lo.ListColumns(.SourceName).DataBodyRange).Select
            MsgBox Title:=.SourceName, _
                   Prompt:="The SourceName for " & ChosenName & " is:" & vbCrLf & vbCrLf & .SourceName
        End With
    Loop
End With

Exit_Point:
StartingCell.Select
End Sub

I had to add a ByRef variable, “FormState,” to the function that initializes and gets the choice from the userform. That’s because, in addition to returning the choice, this function now returns whether the OK, Apply or Close button was clicked:

Function GetChoiceFromChooserForm(strChoices() As String, strCaption As String, ByRef FormState As String) As String
Dim ufChooser As frmChooser
Dim strChoicesToPass() As String

ReDim strChoicesToPass(LBound(strChoices) To UBound(strChoices))
strChoicesToPass() = strChoices()
Set ufChooser = New frmChooser
With ufChooser
    .Caption = strCaption
    .ChoiceList = strChoicesToPass
    .Show
    FormState = .FormState
    If Not FormState = "Close" Then
        GetChoiceFromChooserForm = .ChoiceValue
    End If
End With
End Function

Pivot field lister with apply

Download?

I’m glad you asked. Here it is.

UserForm Event Class – Number Selector

In my world, when a form has a spinbutton, it’s got a textbox. Together they make a little thing I like to call a Number Selector. This handy control lets you pick digits by clicking the spinbutton, typing in the textbox, and even using the up and down keys. Whichever you do, the code keeps the textbox and spinbutton in sync. If you try to type anything non-numeric in the textbox it’s ignored. If you type a number outside the Min or Max of the spinbutton, it reverts to the minimum or the maximum. I find this all quite cool, and fun to code.

A Basic Number Selector

There’s lots of ways to combine a spinbutton and textbox into a number selector. Here’s a basic version of how I code it:

Private wsActive As Excel.Worksheet

Private Sub UserForm_Activate()
Set wsActive = ActiveSheet
Me.spnRowNum.Min = 1
Me.spnRowNum.Max = wsActive.Rows.Count
End Sub

Private Sub spnRowNum_Change()
Me.txtRowNum.Value = Me.spnRowNum.Value
End Sub

Private Sub txtRowNum_Change()
If IsNumeric(Me.txtRowNum.Value) Then
    If Me.txtRowNum.Value < Me.spnRowNum.Min Then
        Me.txtRowNum.Value = Me.spnRowNum.Min
    ElseIf Me.txtRowNum.Value > Me.spnRowNum.Max Then
        Me.txtRowNum.Value = Me.spnRowNum.Max
    End If
    Me.spnRowNum = Me.txtRowNum.Value
Else
    Me.txtRowNum.Value = Me.spnRowNum.Value
End If
End Sub

Spinning the button or typing in the textbox selects a row between 1 and the sheet’s last row:

basic number selector

A Number Selector Class

Continuing the recent theme of of userform control classes, this post is about a number selector class. “Classifying” the control (sorry) eliminates a ton of duplicated code in your form, similar to what was done in the UserForm Event Handler Class – Multiple Controls post.

Besides the basic features discussed above, my number selector has:

  • Accelerator keys. Clicking the Shift, Ctrl and Alt keys increases the spinbutton’s SmallChange property. The accelators are cumulative and don’t care which of these keys were pressed, just how many. For example, if you set accelerators of 2, 3 and 5 and press Shift and Ctrl (or Alt and Ctrl), the increment is increased by a factor of six.
  • A Change event. You capture this event in the calling form, just like you would for Worksheet_Change and other built-in events. One limitation is these only fire for the first class instance in an array or collection of instances. Depending on what you’re doing that might not matter anyways, like in the form below.

Here’s the code for the class. Hopefully the comments get at the tricky stuff. I’ll say more about it below:

Private WithEvents spnSelector As MSForms.SpinButton
Private WithEvents txtSelector As MSForms.TextBox
Private m_Value As Long
Private m_Min As Long
Private m_Max As Long
Private m_Increment As Long
Private m_CurrentIncrement As Long
Private m_Accelerators(1 To 3) As Long
Private m_Executed As Boolean

'call this event in your userform
Event NumberSelectorChanged()

Public Sub Execute()
'call this code when all properties are set
If spnSelector Is Nothing Or txtSelector Is Nothing Then
    Err.Raise 9998, , _
    "Set the Group before other properties" & _
    "and confirm that it contains a TextBox and and SpinButton"
End If
spnSelector.SmallChange = m_Increment
spnSelector.Min = m_Min
spnSelector.Max = m_Max
If m_Value < m_Min Or m_Value > m_Max Then
    m_Value = m_Min
End If
spnSelector.Value = m_Value
txtSelector.Value = m_Value
m_Executed = True
End Sub

Public Property Let Group(grp As MSForms.Frame)
'Note: this property must be set first
'It gets the frame on the UserForm that contains the spinbutton and textbox
Dim ctl As MSForms.Control

For Each ctl In grp.Controls
    If TypeOf ctl Is MSForms.SpinButton Then
        Set spnSelector = ctl
    ElseIf TypeOf ctl Is MSForms.TextBox Then
        Set txtSelector = ctl
    End If
Next ctl
End Property

Public Property Let Value(PassedValue As Long)
m_Value = PassedValue
'don't want to reference controls until Execute sub run
'or you'll get a runtime error
If m_Executed Then
    RaiseEvent NumberSelectorChanged
    spnSelector.Value = m_Value
    txtSelector.Value = m_Value
End If
End Property

Public Property Get Value() As Long
Value = m_Value
End Property

Public Property Let Min(PassedMin As Long)
m_Min = PassedMin
End Property

Public Property Let Max(PassedMax As Long)
m_Max = PassedMax
End Property

Public Property Let Increment(Optional acc1 As Long = 1, Optional acc2 As Long = 1, Optional acc3 As Long = 1, PassedIncrement As Long)
'properties can have parameters, so this property includes the accelators,
'along with the Increment (SmallChange).
'PassedIncrement is the only required one
m_Increment = PassedIncrement
m_CurrentIncrement = m_Increment
m_Accelerators(1) = acc1
m_Accelerators(2) = acc2
m_Accelerators(3) = acc3
End Property

'Acc1, etc., included to match the Let definition, otherwise won't compile
Property Get Increment(Optional acc1 As Long = 1, Optional acc2 As Long = 1, Optional acc3 As Long = 1) As Long
Increment = m_CurrentIncrement
End Property

Private Sub spnSelector_Change()
Me.Value = spnSelector.Value
End Sub

Private Sub txtselector_Change()
With txtSelector
    Select Case .Value
    'Allow a single negative sign or an empty string,
    'but no processing required
    Case "-", ""
        Exit Sub
    End Select
    'whole numbers only
    If IsNumeric(.Value) And InStr(.Value, ".") = 0 Then
        If .Value < m_Min Then
            .Value = m_Min
        ElseIf .Value > m_Max Then
            .Value = m_Max
        End If
        Me.Value = CStr(.Value)
    Else
        .Value = m_Value
    End If
End With
Me.Value = txtSelector.Value
End Sub

'The next four routines capture accelerators (Shift, Ctrl, Alt)
'if pressed while textbox or spinbutton is active

Private Sub spnSelector_KeyDown(ByVal KeyCode As MSForms.ReturnInteger, ByVal Shift As Integer)
SetCurrentIncrement Shift
End Sub

Private Sub spnSelector_KeyUp(ByVal KeyCode As MSForms.ReturnInteger, ByVal Shift As Integer)
SetCurrentIncrement Shift
End Sub

Private Sub txtSelector_KeyDown(ByVal KeyCode As MSForms.ReturnInteger, ByVal Shift As Integer)
If KeyCode = vbKeyDown Then
    KeyCode = vbNull
    txtSelector.Value = txtSelector.Value - m_CurrentIncrement
ElseIf KeyCode = vbKeyUp Then
    KeyCode = vbNull
    txtSelector.Value = txtSelector.Value + m_CurrentIncrement
End If
SetCurrentIncrement Shift
End Sub

Private Sub txtSelector_KeyUp(ByVal KeyCode As MSForms.ReturnInteger, ByVal Shift As Integer)
SetCurrentIncrement Shift
End Sub

Private Sub SetCurrentIncrement(ByVal ShiftMask As Integer)
'Uses bitwise AND's against the Shift enum to determine if the
'Shift, Ctrl or Alt keys were pressed, and
'multiplies the m_Increment by the corresponding accelerator
'accelerators are cumulative

Dim IncrementLevel As Long
IncrementLevel = _
(((ShiftMask And 1) = 1) * -1) + _
                 (((ShiftMask And 2) = 2) * -1) + _
                 (((ShiftMask And 4) = 4) * -1)

m_CurrentIncrement = m_Increment * _
                     IIf(IncrementLevel >= 1, m_Accelerators(1), 1) * _
                     IIf(IncrementLevel >= 2, m_Accelerators(2), 1) * _
                     IIf(IncrementLevel >= 3, m_Accelerators(3), 1)
spnSelector.SmallChange = m_CurrentIncrement
End Sub

Because this class has quite a few properties, the logic for the order in which they must be assigned is a bit clunky. For instance, if you try to assign the Value, Min or Max before you’ve passed the controls to the class, it won’t work. So I created an Execute method – a Sub within the query – that assigns the values from the class-level private variables to the spinbutton and textbox.

There’s also some Err.Raise code try to deal with bad initialization. But I don’t try to handle form-specific issues – I want it to be portable – so if you assign a min of zero and use it to pick row numbers, you’ll get a runtime error.

As mentioned in the comments, the Increment property has three accelerator parameters. I’d never used parameters with a property before. You have to list the “real” one last, and the preceding ones can be optional. If you have a matching Get property, it must include the same parameters, or you’ll get a compile error.

I also added some KeyDown logic for the textbox part of the control. Normally, if you’re in a textbox the down arrow takes you to the next control. I wanted it to act the same as the up and down keys do when the spinbutton is active, so I cancel the KeyDown event if the down or up arrows are pressed, and instead add or subtract the correct amount to the value in the textbox.

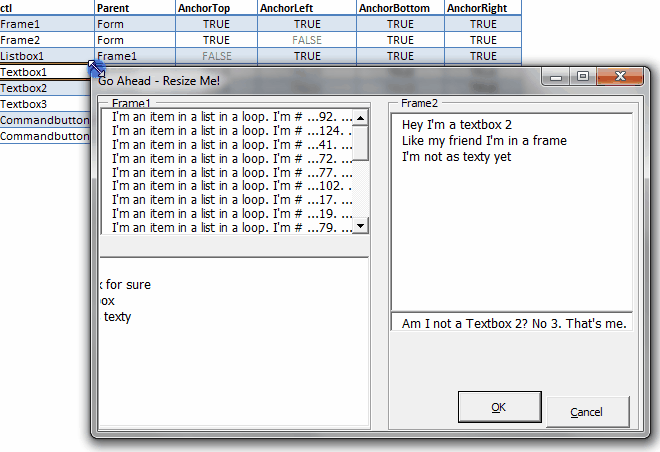
A Form With Three Class Instances

The UserForm for this utilization of the class has three number selectors. The first selects rows, the next selects columns. The third increments the seconds from midnight last night. Each number selector is framed by a … frame. They’re named grpRowSelector, grpColSelector and grpSecondsFromNow respectively (I think of them as Groups, hence the “grp”). It doesn’t matter what the spinbutton and textbox are called, as the class just checks for those controls inside the frame, which is passed to the class in UserForm_Activate.

You can see what I mean about simple code in the form. There’s just the initialization of the classes and the Change event for each one> Note that the this number selector has accelerators of 60, 60 and 24, so you can increment by seconds, minutes, hours or days:

Private WithEvents cRowSelector As clsNumberSelector
Private WithEvents cColumnSelector As clsNumberSelector
Private WithEvents cSecondsFromNow As clsNumberSelector

Private Sub UserForm_Activate()
Dim MaxSeconds As Long

Set cRowSelector = New clsNumberSelector
With cRowSelector
.Group = Me.grpRowSelector
.Min = 1
.Max = ActiveSheet.Rows.Count
.Value = 1
‘properties can have parameters
.Increment(acc1:=5, acc2:=10, acc3:=100) = 1
‘Needed to confirm that properties entered correctly
.Execute
End With

‘see comments for class instance above
Set cColumnSelector = New clsNumberSelector
With cColumnSelector
.Group = Me.grpColumnSelector
.Min = 1
.Max = ActiveSheet.Columns.Count
.Value = 1
.Increment(2, 5, 10) = 1
.Execute
End With

‘see comments for class instance above
Set cSecondsFromNow = New clsNumberSelector
With cSecondsFromNow
MaxSeconds = (10# * 24 * 60 * 60) ‘# to make it a Long
.Group = Me.grpSecondsFromNow
.Min = -MaxSeconds
.Max = MaxSeconds
.Value = 0
.Increment(60, 60, 24) = 1
.Execute
End With
End Sub

‘custom events raised in clsNumberSelector
Private Sub cRowSelector_NumberSelectorChanged()
ActiveSheet.Rows(cRowSelector.Value).Select
Me.txtIncrementValue = cRowSelector.Increment
End Sub

Private Sub cColumnSelector_NumberSelectorChanged()
ActiveSheet.Columns(cColumnSelector.Value).Select
Me.txtIncrementValue = cColumnSelector.Increment
End Sub

Private Sub cSecondsFromNow_NumberSelectorChanged()
Me.txtDateAndTime.Value = Format(Date + cSecondsFromNow.Value / (24# * 60 * 60), “yyyy-mm-dd hh:mm:ss”)
Me.txtIncrementValue = cSecondsFromNow.Increment
End Sub

userform with three number selectors

Download

What you’d like to try this code, but don’t feel like copying and pasting and dragging controls around? I understand. Check this out.

P.S. If you want to read a great post about class properties, you can do no better than this one by Tushar Mehta on DDOE.

UserForm Event Class – Validating Controls

At the end of my last post I said I’d be back with an actual use for a multiple-control event class. And here I am! It seems to me that validating controls in a userform is a very good use for this type of class. Not having the validation mixed in could really unclutter the main form and clarify things. So let’s look at a real-life application that I’ve just updated to this kind of control validation. It’s probably full of bugs, but what the heck.

The application is an addin for splitting worksheets into separate workbooks based on one or two columns. The process starts with a form where users choose the row with the headers and the column(s) to split on. The userform opens with the active row selected and the OK button disabled. When users select a primary column the OK button is activated. If they clear the row textbox, pick a secondary column without a primary column, or pick the same column for both, the OK button is disabled and an error message shows. This functionality is all handled in a multiple-control WithEvents class:

three validation messages

As you can see, there’s a textbox at the bottom to display the validation error message. In all three cases, in addition to showing the message, the OK button is disabled. My hope is that this provides a user-friendly experience: guiding them and letting them try different things without wasting their time pushing “OK” when it’s really not.

The class with the validation looks a lot like the multiple-control class from the last post. Just like there, every control’s click or change event calls the same procedure. In this case it’s a validation procedure, called “CheckReadyState.” It runs a few tests to make sure the various controls are in harmony. If so, the form’s “OK” button is enabled. If not, it’s disabled and a validation error message is shown. Here’s the whole class:

Private WithEvents txt As MSForms.TextBox
Private WithEvents lst As MSForms.ListBox
Private WithEvents chk As MSForms.CheckBox
Private WithEvents spn As MSForms.SpinButton
Private m_PassedControl As MSForms.Control
Private m_ParentForm As MSForms.UserForm

Property Set ctl(PassedControl As MSForms.Control)
Set m_PassedControl = PassedControl
Select Case True
Case TypeOf PassedControl Is MSForms.TextBox
    Set txt = PassedControl
Case TypeOf PassedControl Is MSForms.ListBox
    Set lst = PassedControl
Case TypeOf PassedControl Is MSForms.CheckBox
    Set chk = PassedControl
Case TypeOf PassedControl Is MSForms.SpinButton
    Set spn = PassedControl
End Select

Set m_ParentForm = GetParentForm(PassedControl)
End Property

Private Sub chk_Click()
CheckReadyState
End Sub

Private Sub lst_Change()
CheckReadyState
End Sub

Private Sub spn_Change()
CheckReadyState
End Sub

Private Sub txt_Change()
CheckReadyState
End Sub

Private Sub CheckReadyState()
Dim HelpMessage As String
Dim ReadyState As Boolean

ReadyState = True
With m_ParentForm
    If .txtHeaderRowNum = "" Then
        HelpMessage = "Pick a Header Row"
        ReadyState = False
    ElseIf .lstChooser2.ListIndex <> -1 And .lstChooser1.ListIndex = -1 Then
        HelpMessage = "No Primary Column Picked"
        ReadyState = False
    ElseIf (.lstChooser1.ListIndex = .lstChooser2.ListIndex) And .lstChooser1.ListIndex >= 0 Then
        HelpMessage = "Duplicate Columns"
        ReadyState = False
    Else
        'If we got this far then there's no validation errors,
        'so if they've selected at least a primary column we're ready for the OK button
        ReadyState = .lstChooser1.ListIndex <> -1
    End If
    .cmdOk.Enabled = ReadyState
    SetHelpMessage HelpMessage
End With
End Sub

Function GetParentForm(ctl As MSForms.Control) As MSForms.UserForm
Dim ParentForm As Object

Set ParentForm = ctl.Parent
Do Until TypeOf ParentForm Is MSForms.UserForm And Not TypeOf ParentForm Is MSForms.Frame
    Set ParentForm = ParentForm.Parent
Loop
Set GetParentForm = ParentForm
End Function

Sub SetHelpMessage(HelpMessage As String)
m_ParentForm.lblError.Caption = HelpMessage
End Sub

The basic philosophy here is that a change to any control on the form, or, more accurately, any control having a WithEvents type in the public declarations of this class, triggers the validation routine. It doesn’t matter which control triggers it, the same things are validated. That distinguishes this class’s function, I hope, from the type of checking that syncs the spinbutton/textbox combo, for example what to do if the user tries to spin below zero. It also distinguishes the class functions from what happens when the OK button is clicked. Both those are handled within the userform itself.

Of course, the class does refer to individual controls on the userform as part of the validation, such as checking whether the same column was selected for both listboxes. Note that you can refer to the controls with something like “ParentForm.lstChooser1” although there’s no IntelliSense for them.

I also messed around with a different way to refer to the parent form within the class. As Ross commented on an older post, passing the form to the class seems kind of clunky. I came up with a new clunky way in the “GetParentForm” function. It starts with the calling control and recursively checks parent controls until it climbs to the userform level. As mentioned in my last post, frames are seen as both frame and userform controls when using TypeOf, hence the double check in the “Do Until” line. I could have just checked the control’s TypeName, as mentioned in the last post, but with a form TypeName doesn’t return “UserForm.” It returns “frmWorksheetSplitter” or whatever you called it.

This is all kind of experimental on my part, and I’m sure parts of it could be made more object-oriented or otherwise improved, so let me know. I do like having the validation off in it’s own world, instead of mixing it in with the rest of the form code.

UserForm in action

The userform is similar to the one in A Flexible VBA Chooser Form. To see how it works, and how I populate the listboxes, and any number of wondrous things, download the workbook.