UserForm Event Class – Multiple Control Types

I’ve been fooling around with UserForms lately and have a couple of posts in mind. This one describes a UserForm event class that handles more than one type of form control.

There’s good explanations on the web for creating arrays of userform controls that handle all the events for a certain type of control, like a TextBox. That way, for example, you don’t have to duplicate the click event for each TextBox. In this post I create a single event-handler class for multiple types of controls: CheckBoxes, ComboBoxes, OptionButtons, and the like. This way you don’t need to create a separate class for each type of control – one class can handle them all.

(If the idea of an array of event-handler classes is new to you, please click the link above. John Walkenbach has a nice example too. The very brief explanation is that you create an array of classes, one for each control, which then handle whatever control events you specify in the class. Note that I use a collection instead of an array. That’s just how I learned it.)

The class in this example, called “clsMultipleControls,” handles the click or change events for CheckBoxes, ComboBoxes, ListBoxes, OptionButton, SpinButtons and TextBoxes. It has one property, called “PassedControl,” with an associated class-level variable, “m_PassedControl.” When m_Passed_Control is set, the code determines its type and assigns it to the appropriate WithEvents control. So, if the passed control is a TextBox the “txt” variable is set to m_Passed_Control. The last routine just prints the control’s name, as a stand-in for the real work that your class could do.

Private m_PassedControl As MSForms.Control
Private WithEvents chk As MSForms.CheckBox
Private WithEvents cbo As MSForms.ComboBox
Private WithEvents lst As MSForms.ListBox
Private WithEvents opt As MSForms.OptionButton
Private WithEvents spn As MSForms.SpinButton
Private WithEvents txt As MSForms.TextBox

Property Set ctl(PassedControl As MSForms.Control)
Set m_PassedControl = PassedControl

Select Case TypeName(PassedControl)
Case "CheckBox"
    Set chk = PassedControl
Case "ComboBox"
    Set cbo = PassedControl
Case "ListBox"
    Set lst = PassedControl
Case "OptionButton"
    Set opt = PassedControl
Case "SpinButton"
    Set spn = PassedControl
Case "TextBox"
    Set txt = PassedControl
End Select
End Property

Private Sub cbo_Change()
PrintControlName
End Sub

Private Sub chk_Click()
PrintControlName
End Sub

Private Sub lst_Change()
PrintControlName
End Sub

Private Sub opt_Click()
PrintControlName
End Sub

Private Sub spn_Change()
PrintControlName
End Sub

Private Sub txt_Change()
PrintControlName
End Sub

Sub PrintControlName()
Debug.Print m_PassedControl.Name
End Sub

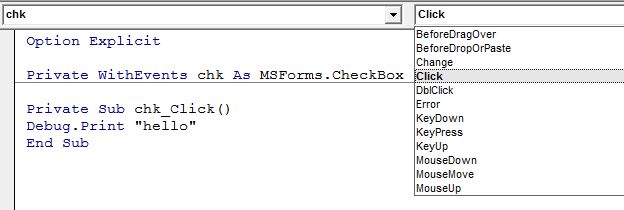
The event routines above are just a sample. You can use as many events as are supported by that type of control. For example, a ComboBox supports the click, DropButtonClick, KeyUp and Mousedown events, among others. One limitation is that WithEvents controls don’t support Exit and Enter (and some other) events, as those are actually generated at the Userform level. To see which events are supported by a certain type of control, use the two dropdowns at the top of the class module:

WithEvents event types

One thing to note above is that I used the “TypeName” function rather than something like

TypeOf ctl Is MSForms.ComboBox

. One reason is that you can’t seem to use TypeOf in a Select Case statement. The second is that some controls return True for multiple types. For example, the OptionButton passes both “Is MSForms.OptionButton” and “Is MSForms.CheckBox.” I assume this is because the OptionButton is based on the Checkbox.

Here’s the initialization code in the UserForm. As promised, it’s very simple.

Public collControls As Collection
Private cMultipleControls As clsMultipleControls

Private Sub UserForm_Activate()
Dim ctl As MSForms.Control

Set collControls = New Collection
For Each ctl In Me.Controls
    Set cMultipleControls = New clsMultipleControls
    Set cMultipleControls.ctl = ctl
    collControls.Add cMultipleControls
Next ctl
End Sub

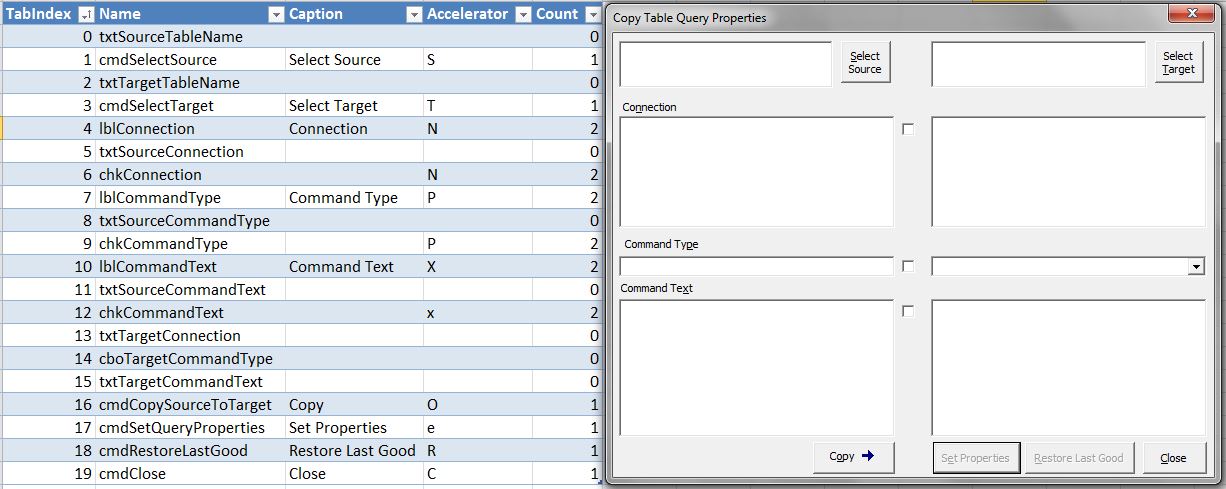
This code establishes a collection of instances of clsMultipleControls, one for each control in the form. Each class instance has an instantiated m_Passed_Control variable, and no more than one instantiated WithEvents control. I say “no more than one” because with this setup, although a CommandButton would generate a class, there’s no WithEvents CommandButton variable, so it wouldn’t be identified in the class’s

Set ctl

subroutine.

UserForm in action

I suppose this might be seen as inefficient, stuffing all these possibilities into a single class. But I like the way it simplifies the form coding and the flexibility of the class. What do you think?

In the next post, I’ll expand this class a bit and demonstrate what I think is a nice use for this type of class. I’ll also show a situation where TypeOf is required (I think), the problem that creates and the solution I came up with.

Meanwhile, here’s a downloadable workbook with the UserForm and class.

Listing UserForm Accelerator Keys

Towards the end of the last post I showed a form I made to copy query properties from one table to another. That userform has 20 controls and, as always before I post something for your enjoyment, I tried to make is as user-friendly as possible.

So I set the default and cancel properties to the appropriate buttons and arrange the tab order of all the controls. When that’s done I assign accelerator keys to some of the controls. The accelerator property specifies a letter or other key, which when pressed along with the Alt key, activates that control.

button accelerator key

In the example above, a helpful but peevish developer has specified the % key as the accelerator, perhaps for the first time in history.

tab_ dialog

I enjoy the fiddly work of setting tab orders and accelerators. I’d enjoy it more if the tab order dialog weren’t so hard to read.

It’s also hard to tell which controls have which accelerators and whether you’ve already used a certain letter.

So I wrote a bit of code that takes a userform as an argument and prints the relevant control properties to a newly-minted worksheet.

Sub ListUserFormAccelerators(frm As UserForm)
Dim ControlsCount As Long
Dim i As Long
Dim ctl As msforms.Control
Dim ControlName As String
Dim ControlTabIndex As Long
Dim ControlCaption As String
Dim ControlAccelator As String
Dim ControlProperties() As Variant
Dim ws As Excel.Worksheet
Const TableHeaders As String = "TabIndex,Name,Caption,Accerator,Count"

ControlsCount = frm.Controls.Count
ReDim ControlProperties(1 To ControlsCount, 1 To 4)
For i = 1 To ControlsCount
    Set ctl = frm.Controls(i - 1)
    ControlName = ctl.Name
    ControlTabIndex = ctl.TabIndex
    ControlCaption = ""
    ControlAccelator = ""
    'some controls don't have the next two properties
    On Error Resume Next
    ControlCaption = ctl.Caption
    ControlAccelator = ctl.Accelerator
    On Error GoTo 0
    ControlProperties(i, 1) = ControlTabIndex
    ControlProperties(i, 2) = ControlName
    ControlProperties(i, 3) = ControlCaption
    ControlProperties(i, 4) = ControlAccelator
Next i
Set ws = Workbooks.Add.Worksheets(1)
With ws
    .Range("A1:E1") = Split(TableHeaders, ",")
    .Range("A2").Resize(ControlsCount, 4) = ControlProperties
    With .ListObjects.Add(xlSrcRange, .UsedRange, , xlYes)
        .Name = "tblControlProperties"
        .ListColumns("Count").DataBodyRange.FormulaR1C1 = "=COUNTIF([Accerator],[@Accerator])"
        With .Sort
            .SortFields.Add Key:=Range("tblControlProperties[TabIndex]")
            .Header = xlYes
            .Apply
        End With
        .Range.Columns.AutoFit
    End With
    'Want to close without prompt to save
    .Parent.Saved = True
End With
End Sub

The code loops through a form’s controls and ultimately adds them all to an array which is dumped into a worksheet created in the code.

You’d call it like this:

Sub HereYouGo()
ListUserFormAccelerators frmCopyTableQuery
End Sub

And the result looks like this (click on it to open in its own, larger, window):

code output

You may notice that some of the accelerators are doubled above. Each pair is for a label, followed by a textbox with no accelerator and then by a checkbox, which has the second occurrence of that acceelator. There’s two things going on here. The first is that if a control isn’t a Tab Stop, like a label, then the accelerator will take you to the next control, in this case the textbox. The second is that I wanted the user to be taken to the associated checkbox if they hit the accelerator again.

I can’t figure out how to call this code from another project. I messed around with Application.VBE.VBProjects, but can’t get it to work. Another nice thing would be the inverse of this code, a routine that would apply the tab order and accelerators from the worksheet to the userform.

Filter as you type with FilterMatic!

FilterMatic form

Whenever possible I employ lookups, crosswalks and whining to avoid correcting data by hand. Sometimes my best efforts fail, and I end up fixing lists one funky cell at a time. The horror! Happily I’ve created FilterMatic to ease the pain.

Say for instance, you’re giving a birthday party for a hundred or so of your oldest friends, all born on October 26. You’ve got this handy reference list of names, years of birth and notable accomplishment:

birth years

source:http://www.historyorb.com/today/birthdays.php


Meanwhile you’ve got another, very similar, list that calculates their age – with a lookup to the “year” column on the first list – so you can embarrass them by putting it on their place setting. The problem is some names are misspelled and you’re getting #N/A’s.

So you filter to just the #N/A’s and start to fix them. Wouldn’t it be nice if, as you fixed the errors, they were automatically filtered away? It’s true that in modern Excel tables you can do this with right-click>Filter>Re-Apply. But now with FilterMatic your corrections are instantly whisked from sight!

In the example below, I’m fixing the names, at first without FilterMatic running. After the third fix, I start it up. The first thing that happens is the filter is re-applied. After that the filter is re-applied with every change to the table and each fixed row is filtered away.

FilterMatic in Action!

FilterMatic™ works on worksheet and table filters, re-applying them on the active sheet whenever you change a cell within a filtered area. And with FilterMatic™ there’s no confusing buttons or messy dropdowns. Just turn it on to start filtering! Close it when you’re done! But wait, there’s more! Download now and receive a free puppy!

Here’s the code:

Private WithEvents app As Excel.Application
Private WithEvents wsActive As Excel.Worksheet
'My ShowModal Property must be set to False

Private Sub UserForm_Activate()
Set app = Application
If Not ActiveSheet Is Nothing Then
    Set wsActive = ActiveSheet
    FilterMatic
End If
End Sub

Private Sub app_SheetActivate(ByVal Sh As Object)
Set Sh = wsActive
End Sub

Private Sub wsActive_Change(ByVal Target As Range)
FilterMatic
End Sub

Private Sub lblFilterMatic_DblClick(ByVal Cancel As MSForms.ReturnBoolean)
'apply changes by double-clicking the form
FilterMatic
End Sub

Sub FilterMatic()
Dim lo As Excel.ListObject

Set lo = Selection.ListObject
'if the selection overlaps a table
If Not lo Is Nothing Then
    With lo
        'Table is in filter mode
        If .ShowAutoFilter Then
            .AutoFilter.ApplyFilter
        End If
    End With
Else
    'It will only re-apply a worksheet-level filter if
    'there's no tables on the sheet.
    With wsActive
        'if sheet is filtered
        If .FilterMode = True Then
            'if the selection overlaps the worksheet's filtered area
            If Not Intersect(Selection, .AutoFilter.Range) Is Nothing Then
                .AutoFilter.ApplyFilter
            End If
        End If
    End With
End If
End Sub

When the form is opened an application object is created. This object monitors all “SheetActivate” events in Excel and sets the activated worksheet to wsActive. There are three events that trigger the filtering code: opening the form, changing something in wsActive or clicking the label in the center of the form.

The FilterMatic sub checks for both ListObject and worksheet-level filters. If the selection at the time of the change intersects one, then that filter is updated. Note that if a listobject is found, it won’t go on to re-apply a worksheet filter. I tried that and couldn’t imagine a reasonable worksheet design that would have both filter types, and anyways the results were weird. Also note that if you change two listobjects at once, the filter would only be applied to one of them: whichever is the Selection.ListObject.

Here’s a workbook with the code and the lists.

And be sure to join the email list so you won’t miss my next exciting product: PivotMasher!

More Listbox Filtering With the Like Operator

Since posting about filtering a listbox, I’ve been thinking a lot about VBA’s Like operator. I realized I could type in filters such as ‘[4-7]#‘ which matches two-digit numbers between 40 and 79. I raced to my computer to try it out, typed the opening bracket and was halted in my tracks:

invalid pattern string

It makes sense that a “[” without a “]” is untenable in a Like pattern. It needs the closing bracket to mark the end of the character set. On the other hand, a single “]” is legal and just stands for itself. You can match a left bracket by putting brackets around it, so the following expression in the Immediate Window yields True:

? "[" Like "[[]"

I set to creating a function that would detect the invalid left bracket. I tried testing whether there were more left than right brackets, but since you can have two left ones in a row, and as many right ones as you want, that wouldn’t fly. To avoid a complicated set of tests, I turned to the VBA standby of attempting something inside of On Error statements, something whose failure yields specific and helpful information, like “hey that’s an invalid pattern.”

Here was the first attempt, which seemed to do the trick:

Function ValidLikePattern(LikePattern As String) As Boolean
Dim temp As Boolean
On Error Resume Next
temp = ("A" Like LikePattern)
If Err.Number = 0 Then
    ValidLikePattern = True
End If
On Error GoTo 0
End Function

You pass it a pattern and it tests it against the simplest possible string – “A”. My assumption was the test would either pass, if there was no left bracket, or fail if there was. I was wrong on two counts.

The first is that Like actually has three possible outcomes: True, False or Null. It returns Null if either the string being compared or the pattern is an empty string.

Much more important to my function, Like is lazy. It only tests as far as needed. So, while this returns an “Invalid pattern string” message:

? "A" Like "["

This doesn’t:

? "A" Like "A["

It just returns False. I guess Like compares the first characters, sees they match and checks whether the next one is an asterisk, the only character that could match at this point. Since it’s not, Like says “whatever” and quits, ignoring the left bracket’s tenuous status.

I could fix the function – kind of – by using a really long string in place of “A” and force Like to look harder. Instead I surrounded LikePattern in asterisks:

temp = ("A" Like "*" & LikePattern & "*")

This says there could be an infinite number of characters at the beginning of the pattern, so Like needs to be thorough and compare all the way through. I suppose this slows the code. I also guess I don’t need the “*” at the end. At any rate, I can now type a left bracket into the filter textbox without an error:

filter with bracket

I updated the sample workbook from the ListBox Filter With WildCards post. It now calls the ValidLikePattern function at the beginning of the main loop. If the pattern isn’t valid, the loop is exited and the filtering stays the same until the next change in the filter textbox. Here’s the updated download.

Help Me Test Table Viewer

As I mentioned at the end of that post, I’m incorporating this logic and a bunch of features into a Table Viewer addin. I think it’s even more “freakin’ awesome” than MenuRighter. I’ve been using it every day. I just added the ability to specify exact matches, “contains”, “begins with”, etc. If you’d like to help me test it, please leave a comment or use the contact form to let me know. Or wait for my next post.

ListBox Filter With Wildcards and Unique Values

This post demonstrates a simple setup to filter a userform listbox as you type into a textbox. The filter uses VBA’s Like operator to pick up matches anywhere within the string. For example, typing “ursumb” matches to “yousumbuddy.” The Like operator allows wildcards, so “/*/201?” matches all dates from 2010 onwards. Like is also case-sensitive, so it can filter by case, or not, as specified. In addition the code uses the tried and true Collection method to allow filtering by unique items.

So, with this list of most popular US girls’ names for 2012 (modified in favor of “Emily”) you can filter and then add Unique and Case Sensitive filters. Note that clicking a name takes you to that row in the table:

listbox filter

Nice, isn’t it? Here’s the main routine, which gets called whenever the text in the filter textbox changes or one of the checkboxes is clicked:

Sub ResetFilter()
Dim rngTableCol As Excel.Range
Dim varTableCol As Variant
Dim RowCount As Long
Dim collUnique As Collection
Dim FilteredRows() As String
Dim i As Long
Dim ArrCount As Long
Dim FilterPattern As String
Dim UniqueValuesOnly As Boolean
Dim UniqueConstraint As Boolean
Dim CaseSensitive As Boolean

'the asterisks make it match anywhere within the string
FilterPattern = "*" & Me.txtFilter.Text & "*"
UniqueValuesOnly = Me.chkUnique.Value
CaseSensitive = Me.chkCaseSensitive

'used only if UniqueValuesOnly is true
Set collUnique = New Collection
Set rngTableCol = loActive.ListColumns(1).DataBodyRange
'note that Transpose won't work with > 65536 rows
varTableCol = Application.WorksheetFunction.Transpose(rngTableCol.Value)
RowCount = UBound(varTableCol)
ReDim FilteredRows(1 To 2, 1 To RowCount)
For i = 1 To RowCount
    If UniqueValuesOnly Then
        On Error Resume Next
        'reset for this loop iteration
        UniqueConstraint = False
        'Add fails if key isn't UniqueValuesOnly
        collUnique.Add Item:="test", Key:=CStr(varTableCol(i))
        If Err.Number <> 0 Then
            UniqueConstraint = True
        End If
        On Error GoTo 0
    End If
    'True if UniqueValuesOnly is false or if
    'UniqueValuesOnly is True and this is the
    'first occurrence of the item
    If Not UniqueConstraint Then
        'Like operator is case sensitive,
        'so need to use LCase if not CaseSensitive
        If (Not CaseSensitive And LCase(varTableCol(i)) Like LCase(FilterPattern)) _
           Or (CaseSensitive And varTableCol(i) Like FilterPattern) Then
            'add to array if ListBox item matches filter
            ArrCount = ArrCount + 1
            'there's a hidden ListBox column that stores the record num
            FilteredRows(1, ArrCount) = i
            FilteredRows(2, ArrCount) = varTableCol(i)
        End If
    End If
Next i
If ArrCount > 0 Then
    'delete empty array items
    'a ListBox cannot contain more than 65536 items
    ReDim Preserve FilteredRows(1 To 2, 1 To Application.WorksheetFunction.Min(ArrCount, 65536))
Else
    're-initialize the array
    Erase FilteredRows
End If
If ArrCount > 1 Then
    Me.lstDetail.List = Application.WorksheetFunction.Transpose(FilteredRows)
Else
    Me.lstDetail.Clear
    'have to add separately if just one match
    'or we get two rows, not two columns, in ListBox
    If ArrCount = 1 Then
        Me.lstDetail.AddItem FilteredRows(1, 1)
        Me.lstDetail.List(0, 1) = FilteredRows(2, 1)
    End If
End If
End Sub

This routine takes advantage of the fact that Collection keys must be unique. If “Unique” is checked on the form, we test each value before adding it to the ListBox’s array.

The FilterPattern string has asterisks at the beginning and end. This is why the filter matches if it’s found anywhere within a table item.

In addition to the girl’s name, an array item also holds the record number for that name. This is used in another subroutine that activates the table row when the listbox selection changes:

Private Sub lstDetail_Change()
GoToRow
End Sub

Sub GoToRow()
If Me.lstDetail.ListCount > 0 Then
    Application.Goto loActive.ListRows(Me.lstDetail.Value).Range.Cells(1), True
End If
End Sub

Here’s how it looks when filtering dates:

filtered dates

The speed is quite reasonable for tables with less than 10,000 items. Above that it gets slow, but is still usable all the way up to the limit of 65,536 listbox items. Yikes!

Here’s a workbook with all the code and the name and date tables to fool around with.

An Invitation

I’ve expanded this concept into a full-fledged Table Viewer. I’ve been using it in its alpha state and it’s quite handy for zipping around a big table. Along with the features here, it handles multiple columns, allows you to view only visible rows, and some other stuff. If anybody is interested in testing it out, leave a comment here or use the contact form.

Prompt to Add New Items to ComboBox or Data Validation

Microsoft Access ComboBoxes have a handy NotinList event which allow you to check whether a value entered in a combobox is already in its list. If it’s not you can ask the user whether to add it. This post shows how to mimic that functionality in a combobox on a VBA userform. I also show how to do the same thing with a data validation list.

hat ComboBox

Creating a ComboBox NotInList Event

The key to doing this is checking the value of the ComboBox’s “MatchFound” property in its Exit event. If no match is found, we ask the user whether to add the item to the list of valid items (hats in this case). If the answer is “Yes” then a row with the hat is added to the table. If not, we clear the combobox and keep the focus on it. You can see this in action in the video above.

Here’s the code for the combobox’s Exit event:

Private Sub cboHats_Exit(ByVal Cancel As MSForms.ReturnBoolean)
Dim loValidationSource As Excel.ListObject
Dim loRow As Excel.ListRow

'the Table with the list of valid hats
Set loValidationSource = wsTables.ListObjects("tblValidationSource")
With Me.cboHats
    'We're only interested if these aren't true
    If .MatchFound Or .Value = "" Or .Value = STARTING_VALUE Then
        Exit Sub
    End If
    'If the hat entered isn't in list, prompt to add it
    If MsgBox(.Value & " is not in the list. Add it?", vbYesNo + vbDefaultButton2 + vbQuestion) = vbYes Then
        Set loRow = loValidationSource.ListRows.Add
        loRow.Range.Cells(1).Value = .Value
        SortSourceTable
        RefreshComboList
    Else
        'if "no", keep focus on the ComboBox and set it's value to "Choose a hat"
        Cancel = True
        Me.cboHats.Value = STARTING_VALUE
    End If
End With
End Sub

One important thing is that the combobox’s “MatchRequired” property must be set to False (which is the default). Otherwise the Exit will be preempted by an “Invalid Property Value” message from Excel.

Creating a Data Validation NotInList Event

As with the combobox version, we use an event to prompt the user whether to add an item that’s not in the list. This time we use our own “MatchFound” function to check against the data validation’s source list. Similar to setting the “Match Required” combobox property to False, the data validation version requires that the “Show error alert after invalid data is entered” is unchecked in the data validation setup dialog. This is obviously not the default:

data validation setup

Since I’m working in Excel 2010, I’ve created a single-column table (listobject) to hold the valid items. I then simply pointed the data validation’s Source property at the column, excluding the header. Because the source is in a table, it’s dynamic – it adjusts when you add or remove items from the column. No dynamic ranges are required, just select the cells:

data validation source list

Here’s the code from the ThisWorkbook module, which contains the Workbook_SheetChange event and the MatchFound function:

Private Sub Workbook_SheetChange(ByVal Sh As Object, ByVal Target As Range)
Dim cell As Excel.Range
Dim loValidationSource As Excel.ListObject
Dim loHatCollection As Excel.ListObject
Dim loRow As Excel.ListRow

'wsTables is the sheet's CodeName
If Not Sh Is wsTables Then
    Exit Sub
End If
Set loValidationSource = wsTables.ListObjects("tblValidationSource")
Set loHatCollection = wsTables.ListObjects("tblHatCollection")
'only continue if change is in column with data validation
If Intersect(Target, loHatCollection.ListColumns("Hat Type").DataBodyRange) Is Nothing Then
    Exit Sub
End If
With Intersect(Target, loHatCollection.ListColumns("Hat Type").DataBodyRange)
    For Each cell In .Cells
        If MatchFound(cell.Value) = False And cell.Value <> "" Then
            If MsgBox(cell.Value & " is not in the list. Add it?", vbYesNo + vbDefaultButton2 + vbQuestion) = vbYes Then
                Set loRow = loValidationSource.ListRows.Add
                loRow.Range.Cells(1).Value = cell.Value2
            Else
                cell.ClearContents
            End If
        End If
    Next cell
End With
SortSourceTable
End Sub

Function MatchFound(ValueToCheck As Variant) As Boolean
Dim loValidationSource As Excel.ListObject
Dim ValidationList As Excel.Range

Set loValidationSource = wsTables.ListObjects("tblValidationSource")
Set ValidationList = loValidationSource.ListColumns("Hats Validation List").DataBodyRange
MatchFound = Application.WorksheetFunction.CountIf(ValidationList, ValueToCheck) > 0
End Function

And here’s what it looks like in action:

data validation prompt

The Sort object – Excel 2007 Onwards

My code uses VBA’s Sort object, which appeared in Excel 2007. I like the way it works. You add Sort Fields, just as you do in the user interface, and then apply the sort when needed. If you are using Excel 2003 or earlier you’d need to re-write the two sorting procedures to work with your version.

Also, if you are using Excel 2003 or earlier, see this Contextures post for a non-table way of automatically adding items to a data validation list. You could easily add the code to prompt the user whether to do so.

Download

Here’s a workbook with all the code for both versions.

Hide Pivot Table Single-Item Subtotals

This pivot table looks awkward. The countries without provinces have a lone detail line, followed by a subtotal line with the exact same information. You can fix this by collapsing the single-item rows one at a time, but that’s time-consuming, and boring. Wouldn’t it be much more fun to write some code to hide pivot table single-item subtotals?

Pivot with single item subtotals

A year or so ago I did just that. In reviewing it for this post I cleaned it up and learned a few things about where it works and where it doesn’t. When I run it the result looks like this, with the duplicated population counts nicely hidden:

Pivot without single item subtotals

The heart of the code is this simple routine. You pass it a single PivotField and it hides the details for any item in that field that contains just one row:

Sub ProcessPivotField(pvtField As Excel.PivotField)
Dim ptItem As Excel.PivotItem

For Each ptItem In pvtField.PivotItems
    If ptItem.RecordCount > 1 Then
        ptItem.ShowDetail = True
    Else
        ptItem.ShowDetail = False
    End If
Next ptItem
End Sub

In my first version of this code I used ptItem.DataRange.Rows.Count. This caused errors with hidden items, because their DataRange is Nothing. With ptItem.RecordCount it just sails on through.

The main procedure checks whether the cursor is in a pivot table and a few things like that. It then calls a function that returns only the visible pivot table row and column fields:

Function GetPivotFieldNames(pvtTable As Excel.PivotTable) As String()
Dim PivotFieldNames() As String
Dim pvtField As Excel.PivotField
Dim i As Long
Dim PivotFieldsCount As Long

PivotFieldsCount = 0
With pvtTable
    ReDim Preserve PivotFieldNames(1 To .PivotFields.Count)
    For i = LBound(PivotFieldNames) To UBound(PivotFieldNames)
        Set pvtField = .PivotFields(i)
        If pvtField.Orientation = xlColumnField Or _
           pvtField.Orientation = xlRowField Then
            PivotFieldsCount = PivotFieldsCount + 1
            PivotFieldNames(PivotFieldsCount) = pvtField.Name
        End If
    Next i
End With
ReDim Preserve PivotFieldNames(1 To PivotFieldsCount)
GetPivotFieldNames = PivotFieldNames
End Function

The returned pivot fields are passed to a userform not unlike this one, except that it allows you to pick multiple items. That way you can collapse more than one field at a time. (I don’t show the code here, but you can get it all from the download link at the end.)

The form looks like this:

Collapsing single-item rows works great for lists like this one of continents, countries and provinces, because if a country has no subdivisions there’s no further detail to show. It’s just Iceland.

Where it doesn’t make as much sense is with something like sales by year, month, week and date:

Sales by week pivot

Even if you had sales in only one week in February, you’ll probably call it “week 6”, or “February 12 to 19”, or something. But when you collapse February that detail gets hidden.

Even more limiting is that you can’t collapse February for one year and leave it expanded for another. At least, I can’t find any way, either in VBA or in Excel. You either show a total for all your Februaries, or for none. In the example above it would be nice to hide the February 2012 total, but show it for 2013. If anybody knows a way to do that, please let us know.

To fool around with this for yourself you can download a workbook with a couple of sample pivots and the Single-Item Subtotal hider.

NOTE: I noticed a ways into this post that the population data is old. I tried to find something more recent, but didn’t come up with anything that had the provinces/states data. But it was nicely packaged in an Access database.

UserForm Event Handler Class – Multiple Controls

Down through the ages, VBA programmers have asked, “Do I really need a click event handler for each button on my form, even if they all do the same thing?” The answer, of course, is “no.” You can use a class to create an array of event handlers for the controls. In this post, I’ll expand on that concept to groups of checkboxes that work together in a “group/member” relationship.

checkboxes working together

I’ve been working on a form with groups of checkboxes that perform pretty much the same action. All the checkboxes in a row are controlled by a “group” switch. Conversely, the group switch turns on or off, or goes to that grayed-out “Null” position, based on the state of its “member” checkboxes. Just like this worksheet header/footer preview form. In this case the group switches are the “Headers” and “Footers” checkboxes, with the member checkboxes to the right.

This form uses a collection of classes, one for each of the six member controls. Each class instance contains that single member control, along with a collection of all the member controls in the same row, and the row’s group checkbox. The class contains two event handlers: one for the member checkbox, and one for the group checkbox. To be able to create the event handlers, these two controls are declared using the WithEvents keyword.

The class looks like this:

'clsHeadFooterCheckboxes

Public WithEvents GroupCheckbox As MSForms.CheckBox
Public WithEvents MemberCheckbox As MSForms.CheckBox
Public collmemberCheckboxes As Collection
Public ParentForm As MSForms.UserForm

Private Sub MemberCheckbox_Click()
Dim ctl As MSForms.Control
Dim CheckedCheckboxCount As Long

'Avoid endless control click loops
If MemberCheckbox.Enabled Then
    'count the number of checked "member" controls
    For Each ctl In collMemberCheckboxes
        If ctl = True Then
            CheckedCheckboxCount = CheckedCheckboxCount + 1
        End If
    Next ctl

    With GroupCheckbox
        'Also avoid endless control click loops
        .Enabled = False
        'set the state of the group based on whether
        'all, no, or some members are checked
        .TripleState = False
        Select Case CheckedCheckboxCount
        Case 0
            .Value = False
        Case collmemberCheckboxes.Count
            .Value = True
        Case Else
            .TripleState = True
            .Value = Null
        End Select
        .Enabled = True
    End With
End If
SetTextBoxVisibility

End Sub

Private Sub GroupCheckbox_Click()
Dim ctl As MSForms.Control

'turn members on or off depending on group state
With GroupCheckbox
    'TripleState is only true when set by members
    'We don't want it to be available when clicking group
    .TripleState = False
    For Each ctl In collmemberCheckboxes
        'Avoid endless control click loops
        ctl.Enabled = False
        ctl.Value = .Value
        ctl.Enabled = True
    Next ctl
End With
SetTextBoxVisibility

End Sub

Sub SetTextBoxVisibility()
'Set the textboxes paired to the member controls visibility
ParentForm.Controls(Replace(memberCheckbox.Name, "chk", "txt")).Visible = memberCheckbox.Value
End Sub

While writing this code, I solved a problem that stumped me in the past: how to avoid looping of events when a pair of controls each triggers a change in the other. Application.EnableEvents doesn’t apply to userform controls, so you typically create some kind of EventsEnabled boolean variable. This is easy enough when only one control has a change event, but I’ve never been able to get it to work when two controls are affected by each other’s Change or Click events. This project was even more confusing, because events are triggered in three separate class instances, one for each member control in a row!

My solution was inspired by recent experience with VB.Net, where you can simply add and remove event handlers within your code. If you don’t want to trigger events, just unlink the control from its event handler, and add it back when you’re done. Obviously you can’t do that in VBA, but I realized I could disable a control before performing an action that would normally trigger its event. I did this in the MemberCheckbox_Click event. In the other direction it’s a little different. In the GroupCheckbox_Click event I disable the member checkbox and then check its state in the MemberCheckbox_Click event. This acts like an across-all-class-instances global variable that is tested in the groupCheckbox_Click event. I think. At any rate, it works.

Another tricky part was managing the group checkbox’s TripleState property. It only gets turned on in the MemberCheckbox_Click event, and only when some, but not all, of the member checkboxes are checked. This allows us to show a “grayed out” group checkbox. TripleState gets turned back off in the group checkbox’s click event, so when you are clicking it the only possibilities are checked or not checked.

This class is pretty flexible. You can add rows, or checkboxes within rows, and it works correctly. Just be sure to add the controls within the appropriate group and follow the naming pattern of the existing controls.

The userform code looks like this:

Private cHeadFooterCheckboxes As New clsHeadFooterCheckboxes
Private collCheckBoxClasses As Collection
Private WithEvents ThisBook As Excel.Workbook

Private Sub UserForm_Initialize()

Set ThisBook = ThisWorkbook
InitializeClasses
SetWorksheetCombo
SetDisplayTextBoxes
End Sub

Sub InitializeClasses()
Dim ctl As MSForms.Control
Dim RowName As String

Set collCheckBoxClasses = New Collection
'For each group control
For Each ctl In Me.grpgroupControls.Controls
    RowName = Replace(ctl.Name, "chkAll", "")
    InitializeRowClasses RowName
Next ctl
End Sub

Sub InitializeRowClasses(RowType As String)
Dim collRowmembers As Collection
Dim ctl As MSForms.Control

Set collRowmembers = New Collection
For Each ctl In Me.grpmemberControls.Controls
    'If it's a checkbox in the row being processed
    If InStr(ctl.Name, RowType) > 0 Then
        collRowmembers.Add ctl, ctl.Name
    End If
Next
'Create a class for each member control in the row
For Each ctl In collRowmembers
    Set cHeadFooterCheckboxes = New clsHeadFooterCheckboxes
    'initialize the class with the
    'control, other members and group
    With cHeadFooterCheckboxes
        Set .memberCheckbox = ctl
        Set .groupCheckbox = Me.Controls("chkAll" & RowType)
        Set .collmemberCheckboxes = collRowmembers
        Set .ParentForm = Me
    End With
    'add the class to the collection
    collCheckBoxClasses.Add cHeadFooterCheckboxes
Next ctl
End Sub

End Sub

Private Sub cboWorksheets_Change()
If Me.cboWorksheets.Enabled Then
    SetDisplayTextBoxes
End If
End Sub

Private Sub ThisBook_SheetActivate(ByVal Sh As Object)
SetWorksheetCombo
End Sub

There’s other code in the userform that handles the worksheet combobox. You can download a sample workbook to see it all in action.

Userform Application-Level Events

I’ve been fooling around with workbook and application-level events in UserForms. I’ve put them to good use in one or two projects, so thought I’d post about it. While thinking about the best way to present it, I ended up with a form that allows you to track all application-level events in an Excel instance. EventTracker looks like this (click the pic to for bigger one):

EventTracker in Action

Warning: meandering post ahead

curves ahead

Before we get to that though, here’s how you can create a simple form that responds to all SheetSelectionChange events. First add a userform to a workbook in the Visual Basic Editor, then add a textbox to it. Paste this code into the form’s code module:

Private WithEvents app As Excel.Application

Private Sub UserForm_Initialize()
Set app = Application
End Sub

Private Sub app_SheetSelectionChange(ByVal Sh As Object, ByVal Target As Range)
Me.TextBox1 = Target.Address(external:=True)
End Sub

The code creates a WithEvents Application variable which is used to track application-level events. In this case, we’ll track the SheetSelectionChange event, but you can select other ones by selecting “app” in the dropdown at the top left of the VBA editor and the event in the dropdown at the top right.

Before you run the form you need to set its ShowModal property to False (or there will be no application-level events to track). Or you could just add this code to the code above:

Private Sub UserForm_Activate()
Static Activating As Boolean
If Activating = False Then
    Activating = True
    Me.Hide
    Me.Show vbModeless
End If
End Sub

I didn’t know the above would work until I tried it here. I don’t recommend it for any kind of serious coding, because of the static variable, but I like it. Basically the code only runs the first time UserForm_Activate runs. It hides the form and then shows it again modally, obviating the need to set the ShowModal property in design time or open the form from another module.

Now run the form and you’ll see that every SelectionChange event is reflected in Textbox1.

Simple event tracker form

So, back to the EventTracker form. It has two listboxes, one that shows all the available events to track, and one that lists the events that have occurred. You can set the events to track to all or none, or just some. The listbox is set to MultiSelectExtended, which means you can use Shift and Control to select ranges. I also added code so that Ctrl-A selects the whole list. Plus there’s option buttons!

The listbox that tracks events gets resized as they are added. (The form is resizable as well.) It shows the event and its parameters, such as the name of the worksheet being activated. I changed the parameters slightly, separating out the “Target” argument for the SheetPivotTableUpdate event into a “Pivot” column. The code that adds a row to the recent events uses a paramarray, which is the first time I’ve ever used one.

Here are some of the things I learned while making, and running, the form:

1. Even when the “After pressing enter, move selection” option is off, the SheetSelectionChange event fires after you edit a cell and hit Enter. Who knew?

2. There are a bunch of new events in Excel 2010. I only included “WorkbookAfterSave,” “WorkbookNewChart” and “SheetPivotTableAfterValueChange” in this tool. The rest have to do with Pivot table OLAP cubes.

3. There’s still no BeforeReallyClosing event though.

4. The maximum number of items allowed in a listbox is subject to available resources. On my laptop that equated to 6,242,685, so I didn’t need code to handle overfilling the event tracking listbox.

5. I discovered Chip Pearson’s excellent form resizing API code and used it to set the form with a minimize button and the ability to be resized.

One bit of code that’s useful on its own resizes column widths in a listbox. It’s based on this Daily Dose of Excel post, which in turn was based on a very thorough post by Jan Karel Pieterse. I modified Dick’s code to include the headers in the resizing, and also to base the the resizing only on the listbox’s visible rows:

Private Sub SetLstRecentEventsColumnWidths()

'Uses a hidden label in the form to hold
'text from headers and visible rows and
'resize to the widest one for each column

Dim ColWidths As String
Dim MaxWidth As Double
Dim i As Long
Dim j As Long
Dim VisibleRowsCount As Long
Dim HeaderLabels As Collection
Dim HeaderLabelWidths As Double

'create the HeaderLabels collection
Set HeaderLabels = GetHeaderLabels
With Me.lstRecentEvents
    'skip the code if no rows yet
    If .TopIndex > -1 Then
        VisibleRowsCount = Application.WorksheetFunction.Min((.ListCount - .TopIndex) - 1, .Height / lblHidden.Height)
        For i = 0 To .ColumnCount - 1
            'first get the header label width
            Me.lblHidden.Caption = HeaderLabels(i + 1) & "MM"
            MaxWidth = Application.WorksheetFunction.Max(Me.lblHidden.Width, MaxWidth)
            'only want to resize for the visible rows
            For j = .TopIndex To .TopIndex + VisibleRowsCount
                Me.lblHidden.Caption = .Column(i, j) & "MM"
                MaxWidth = Application.WorksheetFunction.Max(Me.lblHidden.Width, MaxWidth)
            Next j
            ColWidths = ColWidths & CLng(MaxWidth + 1) & ";"
            HeaderLabels(i + 1).Left = HeaderLabels(1).Left + HeaderLabelWidths
            HeaderLabels(i + 1).Width = MaxWidth
            HeaderLabelWidths = HeaderLabelWidths + CLng(MaxWidth + 1)
            MaxWidth = 0
        Next i
        .ColumnWidths = ColWidths
    End If
End With
End Sub

everywhere you go ...
Back to the EventTracker form again. As my father might say “The road is the destination.” Or is it “kindling is fire…?”

The downloadable zip file has a grid showing the events handled and a handy button to start Event Tracker. The workbook is .xlsm format, because if it was saved in .xls then the more recent events wouldn’t be available. You can still run it in XL 2003 as long as you’ve installed the compatibility pack. When running in an earlier version than 2010, events not supported in that version show up in the form module under “General,” rather than under “app.”

Event tracker workbook

A Flexible VBA Chooser Form

Fairly often in VBA code I need to offer the user a list and have them make a choice, like picking which open workbook to do something to. I created a function and a userform to handle these situations. (Around the house, I call the form “ChooserForm” but it’s given name is “frmChooser.”) The function takes an array of choices and a caption as its arguments. The function loads frmChooser and passes it the string array and the caption. When the user makes a choice and clicks OK the function returns the choice to the calling routine.

Let’s look at how it works, starting from the inside out (by which I mean with the userform):

The frmChooser UserForm

Private mboolClosedWithOk As Boolean
Private mChoiceList() As String

Public Property Let ChoiceList(PassedList() As String)
mChoiceList() = PassedList()
End Property

Private Sub UserForm_Activate()
With Me.cboChooser
    .List = mChoiceList()
    .ListIndex = 0
End With
End Sub

Public Property Get ChoiceValue() As String
ChoiceValue = Me.cboChooser.Value
End Property

Private Sub cmdOk_Click()
mboolClosedWithOk = True
Me.Hide
End Sub

Public Property Get ClosedWithOk() As Boolean
ClosedWithOk = mboolClosedWithOk
End Property

Private Sub cmdCancel_Click()
mboolClosedWithOk = False
Me.Hide
End Sub

Private Sub UserForm_QueryClose(Cancel As Integer, CloseMode As Integer)
'in case the user clicked the "X"
If CloseMode = vbFormControlMenu Then
    Cancel = True
    cmdCancel_Click
End If
End Sub

The form has three custom properties. The first, Let ChoiceList, assigns the array of choices to the form’s module-level variable, mChoiceList(). On form activation the combobox cboChooser’s list is filled with the mChoiceList array.

The second property, Get ChoiceValue, is the currently selected value of the combobox. The function will “get” this, after the OK button is clicked, to determine the user’s choice.

The third property, Get ClosedWithOk tells the calling function whether the user hit the OK button. If it’s True then the function will do its processing. If it’s false, then the user hit the Cancel button or the “X,” and we’ll skip the processing.

The Function code

Function GetChoiceFromChooserForm(strChoices() As String, strCaption As String) As String
Dim ufChooser As frmChooser
Dim strChoicesToPass() As String

'why is this necessary?
ReDim strChoicesToPass(LBound(strChoices) To UBound(strChoices))
strChoicesToPass() = strChoices()
Set ufChooser = New frmChooser
With ufChooser
    .Caption = strCaption
    .ChoiceList = strChoicesToPass
    .Show
    If .ClosedWithOk Then
        GetChoiceFromChooserForm = .ChoiceValue
    End If
    Unload ufChooser
End With
End Function

The function creates an instance of frmChooser, called “ufChooser,” passes the Caption and ChoiceList properties and shows the form. After the .Show command, processing passes into the form and the code shown in the previous section. Processing returns to the function when the form is hidden, by either the OK or Cancel button’s click event. The function then checks the form’s ClosedWithOK property. If it’s true the function returns the form’s ChoiceValue property – the value selected in the combobox – to the calling routine.

You may have noticed the question “why is this necessary?” I can’t just pass strChoices() straight into the frmChooser instance. It causes a runtime “internal error.” Instead I have to declare a second string array strChoicesToPass() and copy the first array to it. If anybody can explain why, please share! (I think I could pass a variant straight through, but I don’t.)

The general form of this function’s code, and that of the userform, is from the venerable Professional Excel Development.

Using the Function

Now that we’ve got the function and the form, let’s choose something! I’ve got some code below that lists all the visible fields in a pivot table. When one is picked, the data range for the field is highlighted, along with the source column in the table, and the fields source name is displayed:

Sub ShowPivotFieldInfo()
Dim pvt As Excel.PivotTable
Dim lo As Excel.ListObject
Dim StartingCell As Excel.Range
Dim i As Long
Dim PivotFieldNames() As String
Dim pvtField As Excel.PivotField
Dim ChosenName As String

Set pvt = ActiveSheet.PivotTables("pvtRecordTemps")
Set lo = ActiveSheet.ListObjects("tblRecordTemps")
Set StartingCell = ActiveCell
With pvt
    ReDim PivotFieldNames(1 To .VisibleFields.Count) As String
    For i = 1 To .VisibleFields.Count
        PivotFieldNames(i) = .VisibleFields(i).Name
    Next i
    ChosenName = GetChoiceFromChooserForm(PivotFieldNames, "Choose a Pivot Field")
    If ChosenName = vbNullString Then
        Exit Sub
    End If
    Set pvtField = .PivotFields(ChosenName)
    With pvtField
        Union(.DataRange, lo.ListColumns(.SourceName).DataBodyRange).Select
        MsgBox Title:=.SourceName, _
               Prompt:="The SourceName for " & ChosenName & " is:" & vbCrLf & vbCrLf & .SourceName
    End With
    StartingCell.Select
End With
End Sub

This type of code can be useful when the PivotField names have been changed drastically from their underlying SourceNames, especially if the SourceNames are cryptic, similar, and there’s lots of them. In the picture below the SourceNames in the table were “Field 1”, “Field 2”, etc., but were changed to meaningful names like “Continent” in the pivot table.

Here’s the sample workbook for your downloading pleasure.