Tabbing and Viewing Workbooks on Two Monitors

I often have two workbooks up on two monitors. And of course I have a bunch of other programs open. I used to struggle to view both workbooks at the same time. Using Ctrl + TAB hides the first one as it shows the second one. Two workbooks tiled side-by-side on one monitor have the same issue. The solution I’ve found is to tab “backwards” using Shift + Ctrl + TAB.

The Ctrl + TAB Problem

Below I’m clicking Ctrl + TAB. As soon as the next workbook appears the first one goes away. It seems to go behind the Windows Explorer Window:

Ctrl + TAB

Shift + Ctrl + TAB to the Rescue

Below, I’m using Shift + Ctrl + TAB to cycle “backwards” through the workbooks. For whatever reason, now the first workbook stays visible, and I can see both:

Shift + Ctrl + TAB

This is one of my favorite keyboard tricks. Any explanations of what’s going on would be greatly appreciated, as would any better solutions.

Some Things I Learned Lately

Seems like every day I pick up something new. So I thought I’d make a quick list of stuff I’ve learned lately.

1) XMLAGG in Teradata
Teradata’s handy XMLAGG function lets lets you flatten a column of data into a delimited list, thereby avoiding recursion. Oracle, to which I’m migrating, also has an XMLAGG function but the closer, and better-named, equivalent seems to be LISTAGG. The Teradata documentation is consistently terrible, so instead I’ll link to this Stack Overflow answer from the worthy dnoeth.

2) 64-bit Office Text File Connection Strings
While updating a fancy data-sucking addin I got an error message that my data connection was broke. Turns out MS changed the ODBC connection string for 64-bit ever so slightly from:

Driver={Microsoft Text Driver (*.txt; *.csv)};Dbq=c:\txtFilesFolder\;Extensions=asc,csv,tab,txt;

to

Driver=Microsoft Access Text Driver (*.txt, *.csv);Dbq=c:\txtFilesFolder\;Extensions=asc,csv,tab,txt;

There’s two differences. The addition of the word “Access” was quickly apparent when looking at this site. The second one took me some time to spot. Can you see it? Yup, they changed the semicolon after “*.txt” to a comma. I think it looks a lot better.

3) Format vs WorksheetFunction.Text in VBA to Mimic Cell Formats
I’ve done a couple of posts that attempt to give you a sneak preview of how different formats will look when applied to cells. I was using my ActiveCell Viewer to preview different date formats for a cell. The Viewer used the VBA Format function. I noticed that in some cases it returned text that isn’t what you get in a cell with that formatting.

For instance, below I’ve applied a formatting of an increasing number of “d”s to a date. With formatting of two to four “d”s the two outputs match:

format differences 1

However with 5 or 6 “d”s the VBA function begins to return a weird result that doesn’t match what you’d see in a cell with that formatting:

format differences 2

You can see below that a cell formatting of “dddddd” still returns “Friday,” just like WorksheetFunction.Text. In fact if you close the Format Cells dialog and re-open it, you’ll see that the formatting has been reset to “dddd”.

format differences 3

I’ve since fixed my Activecell Viewer and added some features. I’ll try to remember to post the improved version sometime.

4) You Can Undo a Pivot Table Refresh
Who knew? All these years I assumed you couldn’t. And then I tried it.

pivot table unrefresh

5) Pivot Table Grouped Number Ranges, Once Sorted, Can’t Be Forced Back to Numeric Order
At least I can’t figure out how.

pivot number ranges grouped and sorted

Can you?

Prompt to Name New Sheet

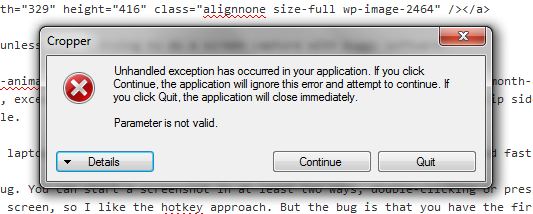
Have you ever seen this dialog?

rename sheet dialog

I’ve only seen it while running a complicated modeless form, forgetting the form was open, and then double-clicking a sheet tab to rename the sheet.

Anyways, the other day I was thinking about how often I create a new sheet and then rename it. Then I thought how cool it would be if every time I added a new sheet I was prompted to name it. Then I thought how that might actually be a pain in the butt, especially when running an addin that adds multiple sheets. So instead I wrote some code that adds a new sheet and immediately prompts for a name.

At the same time I came up with a better answer to the oft-asked question about adding a worksheet in VBA and getting a valid, unduplicated sheet name from the user.

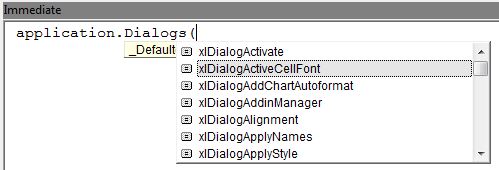
Both of these gems require the dialog box pictured at the top of this page. Before I’d just considered it an odd reminder to close my modeless form, but now it became something I needed. My first step was to find it, which meant remembering how to show an Excel dialog from VBA and then finding the Rename Sheet one:

dialogs list

I searched the list looking for names starting with xlDialogRename, xlDialogSheet and xlDialogWorksheet, but no joy. I got a little nervous that my dialog wasn’t there. But searching through the whole list and trying the likely ones revealed that I was looking for xlDialogWorkbookName. It must have been a long day at the Excel factory when they named that one, but hey, close enough!

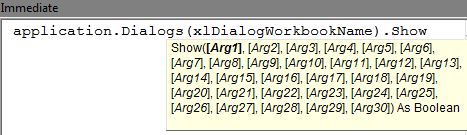
The Application.Dialogs object lets you display Excel’s built-in dialogs. It has only one method: Show. This 2003 MSDN reference is handy because it actually has a link to the arguments for each dialog type, in case you haven’t memorized them. (This information seems to be gone in Excel 2010 online and offline help):

dialogs list arguments

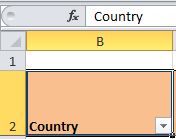
The xlWorkbookName dialog takes two optional arguments, the name of the sheet to rename and the suggested new name. The second argument is what shows in the dialog. If you don’t specify the arguments it uses the Activesheet and its name, respectively.

You’ll notice in the screenshot above that the Show method is boolean. If the user presses OK it returns true, if they cancel it returns false. At first I thought this would be helpful in ensuring a user renames a newly-added sheet. But you really just need to add the sheet, show the dialog, and then check if it’s been renamed:

Sub PromptForNewSheetWithName()
Dim DefaultSheetName As String

ActiveWorkbook.Worksheets.Add
DefaultSheetName = ActiveSheet.Name
Application.Dialogs(xlDialogWorkbookName).Show
If ActiveSheet.Name = DefaultSheetName Then
    MsgBox "You didn't name the new sheet." & vbCrLf & _
           "Processing cancelled", vbExclamation
    Application.DisplayAlerts = False
    ActiveSheet.Delete
    Application.DisplayAlerts = True
End If
End Sub

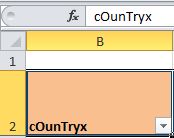
The answers I see on the web for how to prompt a user to name a new sheet all use an InputBox and involve a fair amount of validation for name length, duplicate names and illegal characters (and completely ignore the single quote issue). Using this dialog, you can let Excel do all that validation:

sheet name validation

As for my original idea, I now have a two-line subroutine that adds a sheet and displays the dialog. I use an OnKey command in my personal macro workbook to set it to a Ctrl-Shift-F11 shortcut.

Think of the time I’ll save!

Changing Pivot Field Label’s Case

After last week’s prodigious post I return with a tiny tip: how to change the case of the text in a pivot field’s (or item’s) label. Here’s an example of the problem:

Can't fix case

Above, I’ve noticed that drunken monkeys have hacked my computer and tried to make me look bad by messing up the “Country” label. “Not so fast!” I say and retype it correctly. However, when I click back out of the cell the label reverts to the weird capitalization. Hmmm, perhaps these fiendish monkeys are smarter than I thought!

But no, it’s just one of those Excel quirks. Simply retyping the same letters with the correct case doesn’t fix it. You have to actually change or add a character, leave the cell, and then go back in and fix the case, like this:

Step 1 – add an “x” and hit Enter

Fix Case step 1

Step 2 – type it the way you want it

Fix Case step 2

I could have sworn I’ve seen this same quirk elsewhere in Excel, or perhaps in Windows Explorer, but I looked around and don’t find similar behavior anywhere. If you have, please let me know where, and if this trick works.

Book1.Saved = True

You may be familiar with VBA’s Workbook.Saved property. It’s read/write and lets you determine, or set, whether a workbook has been saved. Reading is straightforward but setting is more interesting. Declaring

MyBook.Saved = True

doesn’t actually save the workbook, it just tells Excel to act like it’s saved. So, if you don’t make any changes to the workbook and you go to close it, you won’t be prompted to save.

floss

If you had asked me if it’s possible to set the Saved property on a never-been-saved workbook I would have said, “I don’t know, let me try it and get back to you.” Well you didn’t ask, but I’m getting back to you anyways. It turns out you can. You can open up a brand-new workbook, type “Movin’ to Montana soon” in A1 and “Gonna be a dental floss tycoon” in A2, then enter

Book1.Saved

in the immediate window, and you won’t be prompted to save if you close it.

I didn’t expect that. It kind of makes sense that you can declare an existing workbook to be saved, but one that doesn’t even have a location yet? That doesn’t sit right with the left side of my brain, which would prefer that the property be re-named to something like

Workbook.YouWontBePromptedToSaveUnlessYouChangeSomething

.

To expand on the above paragraph, a never-been-saved workbook doesn’t have a path. You can test the ActiveWorkbook with

ActiveWorkbook.Path = ""

, which returns True if the workbook has never been saved. I’d thought maybe setting Saved to True would change the Path property to the never-been-saved workbook location, but it doesn’t. Also, if you do decide to save, the Save As menu pops up, just as you’d hope. So it looks like setting Saved to True changes nothing except that you won’t be prompted to save.

I’ve found this useful for a certain kind of utility: one that prints out information which I want to examine but not keep. For instance, there’s a routine I use a lot that compares the sheets in two workbooks. It opens a new workbook and prints information about all the sheets in each book and whether they occur in the other book and, if so, the extent to which they match. The new workbook with the comparison is called “wbComparison,” so the last line of code is:

wbComparison.Saved = True

I know it’s a small thing, but it pleases me to look over the comparison and close it without being prompted to save.

Here’s a very simple sample for your testing pleasure:

Sub ShowZappaLyrics()
Dim wbZappa As Excel.Workbook

Set wbZappa = Workbooks.Add
With wbZappa
    With .Worksheets(1)
        .Cells(1, 1) = "Movin' to Montana soon"
        .Cells(2, 1) = "Gonna be a Dental Floss tycoon"
    End With
    .Saved = True
End With
End Sub

Get UNC Filenames

If you work on a network with mapped servers or drives you may sometimes need a full UNC filename in it’s unmapped state. For example, computers in different departments may refer to the same location by different mappings. Say you work in the Pastry Procurement department and your computer refers to \\AcmeServer0023\Top_Secret_Pie_Recipes as T:\Top_Secret_Pie_Recipes, but your co-worker in Puddings and Pecan Puffs sees it as P:\Top_Secret_Pie_Recipes. If you send them a link using your mapping of “T:\” it won’t work for them. This post solves that problem by converting the mapped path – the one that starts with “T:\” – to its UNC equivalent – the one that starts with “\\AcmeServer0023.”

There are some fine methods out there for doing part of this conversion using VBA such as this comment by Emily at Daily Dose of Excel. That post also includes a method Dick discovered using the generally-reviled Web toolbar (I used to have a macro whose sole function was to hide that useless thing whenever it popped back up) but it only works for open workbooks.

This post incorporates existing Office functionality whereby links created with mapped drives actually show the UNC drive when you edit them. Here I’ve opened the Add Hyperlink dialog and selected a file. Note that the Address box at the bottom shows the mapped filename:

Hyperlink dialog

After closing the dialog and then opening the Edit Hyperlink dialog the Address box shows the UNC filename:

Edit hyperlink dialog

I like this method because it gives you the whole shebang and it works for all file types, not just Excel workbooks. Of course, it’s boring to generate more than a couple, so I wrote some VBA to automate the process. That way I can point to one or more files and paste their UNC monikers wherever I want.

This is a fairly trivial task and I’d rather not wipe out Excel’s Undo stack with the VBA. Since this hyperlink trick works just as well in Word, I thought I’d do it in a quickly opened, used, and then closed, instance of Word.

(You could modify this to open another Excel instance and use that, since you won’t lose the Undo stack across instances. You could also check if Word is already open and use that instance. I used Word because, since I don’t have addins in it, I think it opens faster. I don’t bother checking for an open instance because the whole thing only takes a couple of seconds as is.)

The code is pretty straightforward. It uses late binding for the Word objects, so that it doesn’t care what version of Word you’re using (and so that JP won’t give me grief if he’s still reading this blog). It also uses a Windows DataObject to hold the filenames and copy them to the clipboard.

Sub Browse_To_File_and_Copy_UNC_Names_to_Clipboard()
Dim fdFileDialog As FileDialog
Dim FileName As String
Dim FileNames As String
Dim doFileNames As DataObject
Dim SelectedItemsCount As Long
Dim wrdApp As Object
Dim wrdDoc As Object
Dim TempLink As Object
Dim i As Long

Set fdFileDialog = Application.FileDialog(msoFileDialogOpen)
With fdFileDialog
    .ButtonName = "Select"
    .FilterIndex = 1
    .InitialView = msoFileDialogViewDetails
    .Title = "Select Files"
    .ButtonName = "Select"
    .AllowMultiSelect = True
    .Show
    If .SelectedItems.Count = 0 Then
        GoTo Exit_Point
    End If
    Set doFileNames = New DataObject
    SelectedItemsCount = .SelectedItems.Count
    Set wrdApp = CreateObject("Word.Application")
    Set wrdDoc = wrdApp.Documents.Add
    For i = 1 To SelectedItemsCount
        Set TempLink = wrdDoc.Hyperlinks.Add(Anchor:=wrdApp.Selection.Range, Address:=.SelectedItems(i))
        FileName = TempLink.Address
        FileNames = FileNames & FileName & vbCrLf
    Next i
    FileNames = Left(FileNames, Len(FileNames) - 1)
    doFileNames.SetText FileNames
    doFileNames.PutInClipboard
End With

Exit_Point:
On Error Resume Next
wrdDoc.Close False
wrdApp.Quit
End Sub

When you run the code this dialog pops up. You can select one or more files:

File browser

After you’ve selected them, they’ll be in the Windows clipboard and you can paste them wherever you want, like into an email.

Pasted UNCs

Escape Accidental File Moves

Every so often I’m merrily dragging folders or files around when I realize I’m making a painful blunder. For whatever reason, in mid-drag I just want out. Sure, I could try to retrace my steps back to the source, but maybe it’s no longer in sight. Of course, I could do a Ctrl-Z after the fact and hope that Undo does. But really I just want to escape the accidental file move right now:

Esc key

So one day I did just that. I hit the Escape key and trouble was averted.

I know the real solution is to never drag and always cut/copy and paste with Ctrl shortcuts or menus. But since that’s not going to happen, at least I’ve got an escape plan.

This works in Outlook, the VBA IDE and other places as well.

many borders fast

If you want to draw borders fast in Excel, you can hold down the Ctrl key, select all the areas that need borders and apply them in one swell foop!

many borders

I just realized this recently. It’s pretty fast, unless you’re trying to do a screen capture with buggy software.

Speaking of which, I just found a new straight-to-animated-gif program, called Cropper, that replaced the free-for-one-month-and-then-pay-$300 software (had it for a month.) Cropper works fine so far, except for one major bug. It’s not the most intuitive program, but on the flip side it works with no intermediate steps and produces a pretty small file.

Small enough, that is, that it loads pretty fast on my laptop. I’d be interested to hear from anybody about whether it started fast, or not, for them.

If you do use it, you’ll want to know about the bug. You can start a screenshot in at least two ways, double-clicking or pressing Alt-PrtSc. Double-clicking leaves the transparent blue selection layer on the screen, so I like the hotkey approach. But the bug is that the first time after opening Cropper, you need to start your capture by double-clicking or you’ll see the disheartening .Net runtime error screen.

Cropper error

After seeing it a few times the phrase “come a cropper” leapt to mind. But no worries, after double-clicking once you can use the hotkey for subsequent captures.

If anybody has any suggestions for animated gif software, I’m all ears.